Introduction
The WordPress Gutenberg Query Loop block is possibly the most important core WordPress Block, as it lets us create custom and dynamic pages.
The Query Loop Block lets you dynamically query your website, to create differently styled pages.
WordPress.org describes the Query Loop block as an advanced block that allows you to display posts based on specified parameters. You can think of it as a more complex and powerful Latest Posts block.
With various block patterns integrated into the block setup, you can do things like create a portfolio, a page full of your favorite recipes, or a custom blog page.
Query Loop Video Tutorial
What The Query Block Can Be Used For
The Query Loop block lets you create dynamic pages, here are a few examples of what’s possible.
1) Custom Featured Post Blog Page template, where you have a Featured Post and Image at the top of the page, and your other posts underneath with the Featured Image in the Post Excerpt

2) Custom Masonry Blog Page template, used to create a Masonry grid layout for your blog pages or archive pages

3) Custom WooCommerce Shop Page template

Full Site Editing Requirments
As of today, to use the Query Loop block, you’ll need:
- A full site editing theme active (e.g. Tove)
- The official Gutenberg Plugin installed and activated.
You can learn more about full site editing by watching this video, which gives a full beginners guide.
Once WordPress 5.9 is released in December 2021, the Query Loop will be part of WordPress core.
Custom Featured Post Blog Page
If you start by adding a Query Loop block on the Site Editor page, it will give you different layouts to choose from.
Posts will be pulled in dynamically, so you can alternate between designs by clicking the arrows in the top left-hand corner. However, as we’re building a Custom Featured Post Page, we want to use the layout that has a large Featured Image, with a Post Title and Excerpt on the right.
Clicking the blue Choose button will lock in your selected template to the page.
Note that there is a Start Blank option, next to the Choose button, which will also give you some design options, but will give a blank page to start with.
After selecting the Choose button, you’ll see some extra options pop up on the page.
One of the options is the Display Setting, which will show you:
- Items Per Page

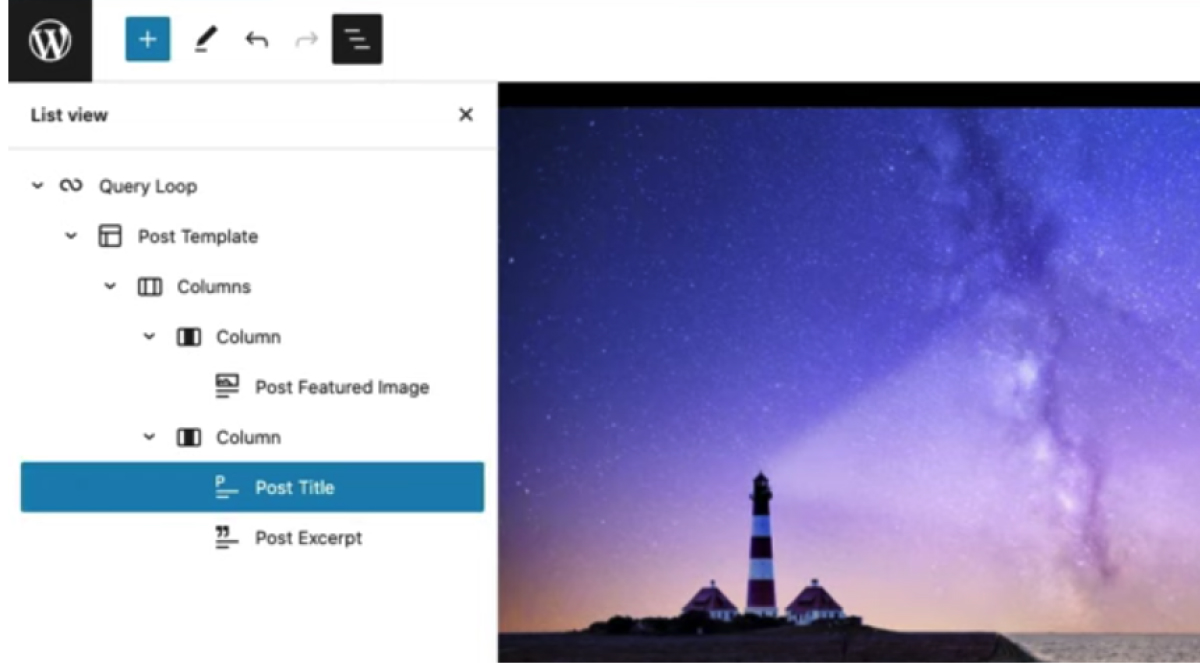
If you click on the List View at the top of the page, it will show you a breakdown of all the active blocks being used. Within the Query Loop block, you will have several other blocks, like:
- Post Template
- Columns
- Post Featured Image
- Post Title
- Post Excerpt
If you wanted to change the page layout, you can drag the blocks around to rearrange the order.
For now, we are interested in changing the colour of the title and text.
So if you select the Post Title/header, then a list of options will appear on the right of the page.
You can now change the Link colour and Text colour by selecting different options.
You can also do this for the text by clicking on the Post Excerpt and changing the options there as well.
Additionally, you can write into the Add “read more” link text part of the Post Excerpt to add in more information. After adding in your changes, remember to click Save at the top of the page.
We have only created a template for our Custom Featured Page so far.
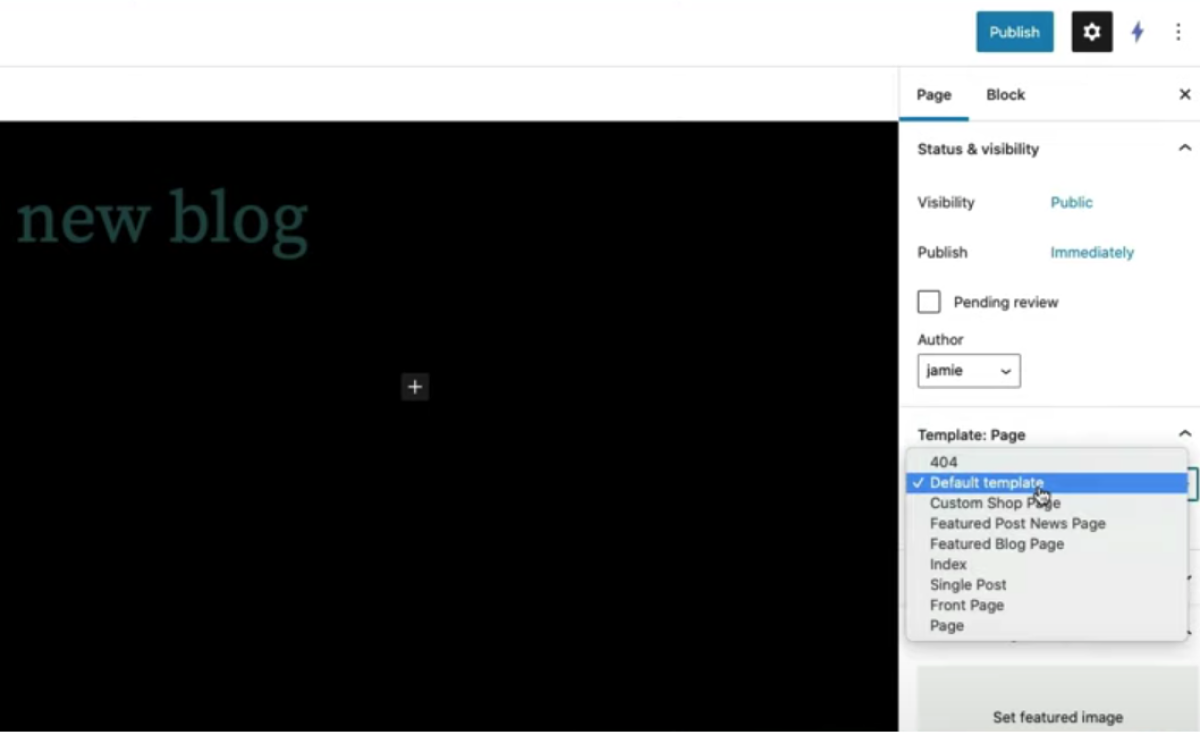
To make the actual blog page, you need to go and create a New Page, that will include the new custom-made template.
You can add in a title first, and then go to the Page settings on the right-hand side.
Under the Template: Page, the option is set to the Default template, so you will want to select the Featured Post News Page.
If you click the blue Publish button, a link to view your page will appear at the bottom left-hand corner.
You don’t need to put any content on the page before publishing, as it will automatically bring in that layout from before (on the Site Editor page).
This new page is using the page template that we previously customised.
Now, if we go back to the Full Site Editor Page, we can add in posts underneath what we have made so far.
By adding in another Query Loop block, you will once again be given the option of different layouts. As we only want to add posts to our page, you should choose the standard grid layout with three columns.
It is missing the Featured Image, but we can add that afterward.

By clicking Choose, it will dynamically bring in those posts to that page.
You may notice that there’s now duplication and part of the text has been copied from the Post Excerpt into the post below which will need changing.
In this case, go to the List View and select the Query Loop Block that you want to change. This will give you a toolbar of options, including a Display Setting, that will show you:
- Items per Page
- Offset
- Max page to show

The Offset option allows you to offset the selected block and skip over a number of posts.
If you change this option to 1, then it will skip over the first post at the top of the page, and instead, bring in the next post.
The Offset is used when you’re using multiple blocks in your page.
You can alter the page design to however you want. For example, changing the Text colour or the Background colour.
Note that if you change the design of one section, then it will automatically change the design for the rest. Again, you can customise the Add “read more” link text by adding in information.
You can also add a Featured Image to wherever you’d like on your page.
To do this, select the Query Loop block from the List View, and press the blue Plus sign to add in a block. Type in Post Featured Image and select it from the block options.
Even just adding an image to one of the columns will mean that an image appears in all of them, as they are all linked together.
You can drag the Featured Image block above or below the text, depending on what you want the layout to look like.

By selecting the Query Loop block, you will see a settings menu on the right-hand side of the page, where you can change the block options. Examples of changes you can make:
- Post Type Setting, which allows you to change the content type on your page, and will give you the choices of; Post, Page, Product
- change the number of columns, using the slider tool
- Order content by Newest to Oldest
- Exclude or include Sticky posts
- Filter the block by Categories, Tags, Author, or Keyword
After making your changes, Save your template and go back to the live version of your page to view the new changes.
You can easily edit any of the page content by going back to the template and editing it.
Posts can also be filtered by category and other cool options.
How to Build a Custom Masonry Blog Page Template
The Masonry grid layout is similar to a brickwork design, where the page dynamically pulls posts into a designed layout.
We have used an example page, already having used the Query Loop block to construct the page, with several blocks already being placed (rather than starting with a blank page).
Start with the page in template view, using the Site Editor.
The List View will show all the blocks being used. In our example, the page has a similar structure to the other page, but with a few more added blocks.

The basis of the page is formed from two column blocks and putting two separate Query Loop blocks into each one.
Clicking the first Query Loop block and going to Settings at the bottom of the page, would show you that our Items Per Page is set to display 4.
The other blocks on the page, such as the Post Featured Image or Post Title have been added in normally and can be easily moved around/removed.
As you have two separate Query Loop blocks, you can edit each column separately.
To get the second Query Loop block to work properly, you must make sure that the Offset value is set to the value of posts that you have on the page (the Items per Page value from the first Loop block).
This is so that the same post won’t be repeated in both columns. After clicking to Save to keep any changes made, you can view the live page that is using the template.
When you’re creating your Custom Post Pages, there is a feature called the Duotone Filter, that allows you to change the colours of your Featured Images.
It is found in the settings panel, after selecting a Post Featured Image. You can apply a specific filter to each Image to give the same colour treatment.
If you change the filter for both Featured Image blocks, then it will automatically change the colours of the other images on the page.
This will save you time, as you won’t have to go into each image and apply a filter individually. Rather than editing the Images at the source, you can just do it in the template.
Custom WooCommerce Shop Page
The Query Loop block could potentially be used for things like WooCommerce and Custom Post Types in the future.
As of now, on the Full Site Editor page, if you have a Query Loop block on your page, and you select it, there will be settings to change your Post Type.
If you switch to the Product post type, then it will dynamically pull the WooCommerce products into the page.
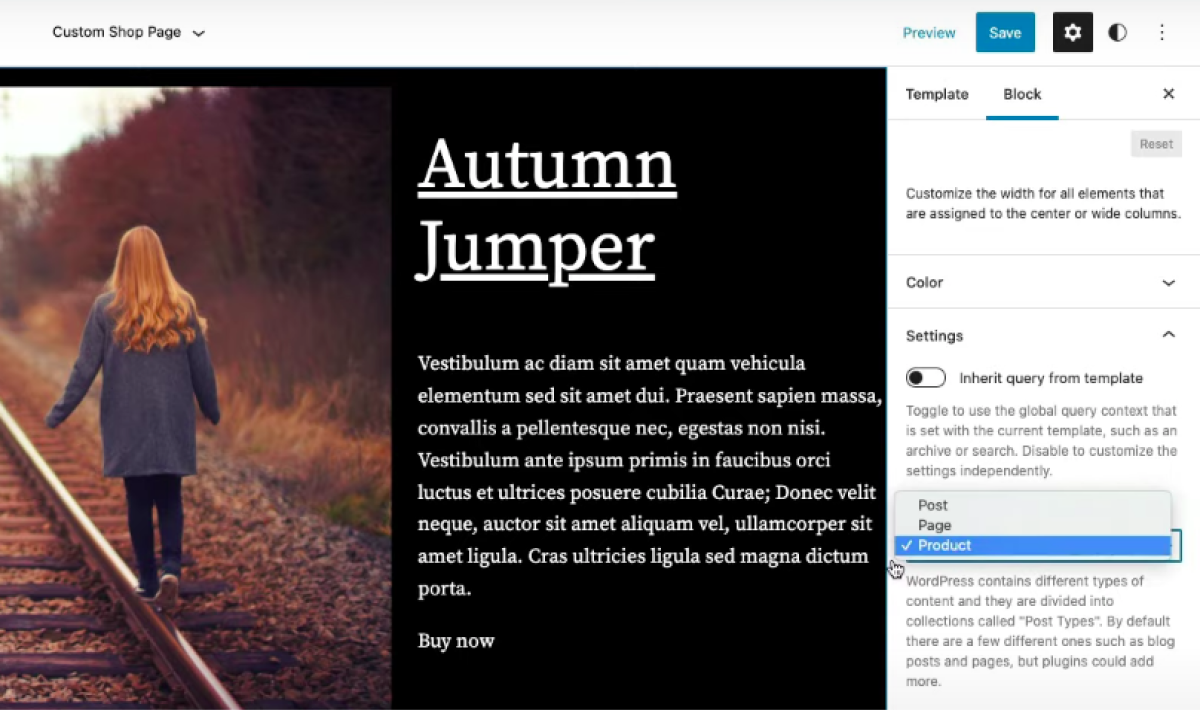
It will be missing some things, such as the price or ‘buying now’ button (which you can add in via a link through the Query Loop block).
In the future, we will be able to fully customise our WooCommerce pages. We are also starting to integrate our WooBuilder Blocks plugin into Full Site Editing.
This plugin lets you customise the WooCommerce product page using Gutenberg, and there will soon be a demo that lets you use it to create Custom Templates for your product pages.
Conclusion
Hopefully, this article has given you a more in-depth understanding of the Query Loop block and how to use all it’s various settings in Gutenberg!
Leave a Reply