Introduction
In this article, we’ll be looking at how to build a custom layout for your single posts using the WordPress Gutenberg Block Editor and Full Site Editing.
We’ll also cover how to export layouts, restore layouts back to the default theme, and look at the importance of dynamic blocks. We don’t need any extra plugins for this, or any page builders such as Elementor or Divi. Today we’re just using core WordPress features.
Requirements
You’ll need to install and activate the latest version of the Gutenberg plugin (which is available via the wordpress.org website) and a Full Site Editing theme, such as:
- Tove – https://wordpress.org/themes/tove/
- Clove – https://en-gb.wordpress.org/themes/cl…
- TT1 Blocks – https://en-gb.wordpress.org/themes/tt…
If you’re unsure of how to use Full Site Editing, this video gives a full explanation of how to use it.
Editing the Single Post Template (using the FSE builder)
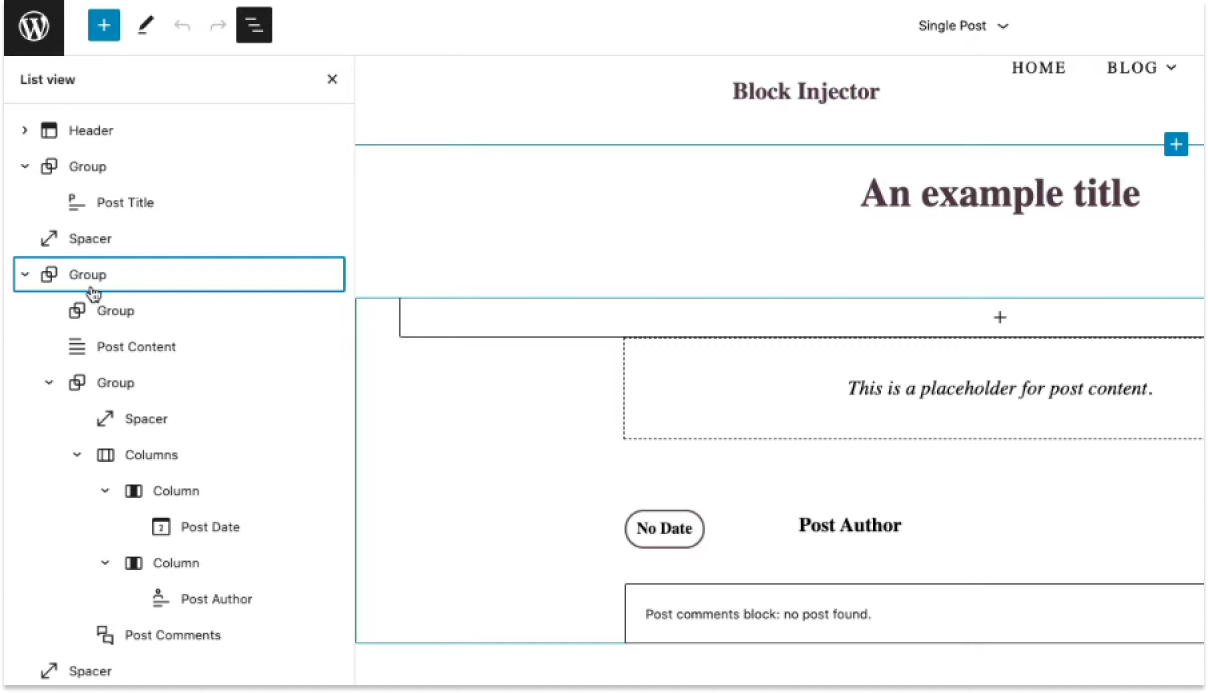
After installing and activating a Full Site Editing theme and the Gutenberg plugin, you’ll see a new menu in your dashboard to choose from, labelled Site Editor. Clicking this link will load in the Full Site Editor, where you can click on the WordPress logo on the top left of the page and choose the Single Post Template. This option lets us edit and customise the Single Post Layout for all our posts. The whole page is built using the Gutenberg block editor. All the blocks are dynamic and are pulling in content automatically from our post content.
We’ve used an example post containing a Post Title and Post Content. You can use the List View button to see all the active blocks. The blocks in our example page include:
- Group block – which includes a Post Title and Spacer.
- Another group block – containing the Post Content, Spacer, Columns, and meta information.
- Header / Footer.
Understanding Dynamic Blocks
Dynamic blocks allow content to be pulled in automatically from your original post content. Full Site Editing gives you many different options, which are all listed under the Theme blocks section in the block inserter. Some of the Theme blocks are to do with your archive pages, but the blocks that are involved with your single post page include:
- Post Title
- Post Content
- Post Date
- Post Excerpt
- Post Featured Image
- Login/out
- Navigation
- Template Part (headers and footers)
- Post Author
- Post Comment
All of these blocks pull in the dynamically generated information directly into your posts. The different blocks are fully integrated into WordPress, so it’s now a block-based system.
Editing the Single Post Template
We’ve used a simplified Single Post template, with only a Spacer, Post Title, and Post Content blocks being used. We’ll be adding changes to the FSE page, and all layout changes made can be seen on the live post page.
Next, we want to add a Featured Image underneath the Post Title. You can do this by either clicking the blue Plus sign underneath the title or clicking the larger Plus sign at the top left of the page. This will launch the block inserter. Scroll down to the Theme blocks section, and drag the Image block onto the page. This will display a placeholder, and the actual Featured Image can be viewed if you Save your template, and go back to the live site.
Each block can be customised. For example, you can increase the Post Title size and change the font type with the Block settings found on the right side of the editor page. This panel is called the settings sidebar.
There will be a placeholder on your page for your post content, and you can add in any of the theme blocks underneath it if you wanted to. For example, you can add in the Post Comments Form block. By saving the page, the new changes can be viewed on the actual site. You would have a new Post Title and Comments box, also with the unchanged Post Content. These features will apply to all of your posts now.
Another change you can make is adding an Overlay to the Featured Image block, which will change the colour of the image. You can do this by selecting the block from the List View and choosing the Duotone Filter button. After saving, you will see the changed image on your site.
The changes will be applied to all of your posts, and they will all inherit this new Single Post Layout that you have created. If you go to any of your other posts, you will see the Featured Image being pulled in automatically and the comments box underneath. If you didn’t want the Comments box to appear, you can just delete it from the List View.
Using Gutenberg makes it so much easier to create our post layout. However, as it is so new, there are some blocks that are potentially missing. For example, having a Cover block that also pulls in your post title automatically within it. You can do this at the moment, but what you cant do is pull in the Featured Image dynamically and set that as the background to that Cover block.
Restoring the Default Layout
Using the Full Site Editor, you have the ability to restore your templates back to the original default theme template. Open up your Single Post template on the FSE and click on the Single Post option at the top of your page. There will be a Clear customisations option from the dropdown. Choosing this will completely restore the template back to the original theme’s default.

Exporting/Importing your Single Post Template
One of the changes that FSE has brought to WordPress is the ability to share layouts between websites. We have already seen this with block patterns, but now we’re seeing it with templates (like the Single Post Template). As everything within your theme is now effectively a block, it can be shared much more freely. By going to the main WordPress admin menu, you will find the Appearance menu, where you can select Templates. This will show you all the templates that you’ve customised, including your Single Post Template.

If you select the Single Post template, You can copy this template onto another website by clicking the three-dotted menu button at the top right of the page and clicking on the Code editor view. This will essentially show the code view of what Gutenberg is doing. Copy all of the coded text and open up another website, with a loaded single post layout. You can remove all of the blocks on the page with the List View by selecting each block and deleting them individually. You will be left with a Paragraph block, which you can use to paste in the layout that was copied from the other website. So the template will be going from one website to a completely different website, but both pages will now share the same Custom Post Layout.
How to Lock Down Full Site Editing
If you are worried about customers using FSE, you can lock it out from customers. This means that it will only be an admin experience, where you have this Full Site Editing functionality.
Conclusion
Hopefully, this article has helped you understand how to build and share a custom layout for your single post templates.
Leave a Reply