Introduction
This article will look at how to add and customise WordPress sidebars, using the Twenty Twenty-Two Block Theme.
In particular, we’ll look at how to:
- Add a sidebar.
- Style a sidebar.
- Create a sticky sidebar.
- Create dynamic sidebars to display different sidebars on different pages
This link will take you to a free training website with the Twenty Twenty-Two Block Theme pre-installed.
How to Add a Sidebar to a Gutenberg WordPress Block-Based Theme
Make sure you’re first logged into your website and go to Appearance > Editor via the WordPress admin. This will take you to the site editor. Select the WordPress logo (W) at the top left of the page and select Templates to display a list of templates included with the plugin. The Twenty Twenty-Two Block Theme has three page templates: Page, Page (Large Header), and Page (No Separators). Select the Page template, which will load in the main page template.
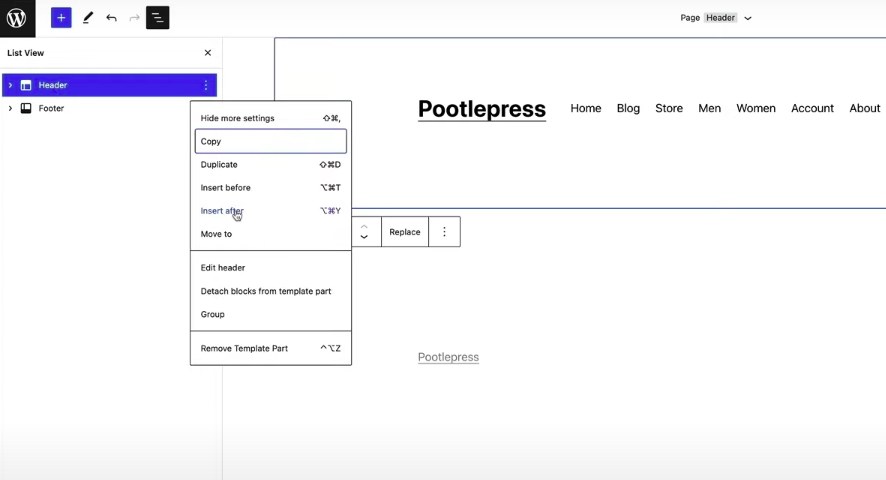
Use the List View button to display all the blocks that make up the page structure. In this case, our page is made up of a Header, Footer, and Group blocks. The Group block contains several other blocks, including a Post Title, Featured Image, and Post Content. To start with, delete the Group block by clicking on the options icon to the right of the block in the List View and selecting Remove Group.

Now we’ll be left with just the Header and Footer blocks. Essentially, we’re going to create a layout with a sidebar using only the Columns block, but if you have a favourite third-party layout block, you could use that instead. Click the options icon for the Header block via the List View, and choose Insert after from the drop-down list of options.
This will insert a paragraph block on the page between the header and the footer. Now type /columns into the empty block field to add a Column block. Alternatively, you could use the block inserter (blue plus sign) to find and drag across the block. After inserting the Column block, there will be a row of layout options to choose from. In this case, we want the content to be on the left of the page and the sidebar to the right, so choose the 70/30 option in this case. You can change the width of the columns by clicking into the column block and selecting the Width controls in the block Settings panel on the right side of the page.
Note: If the settings panel isn’t currently visible then you display it by clicking the gear icon next to the Save button located towards the top right of the screen.
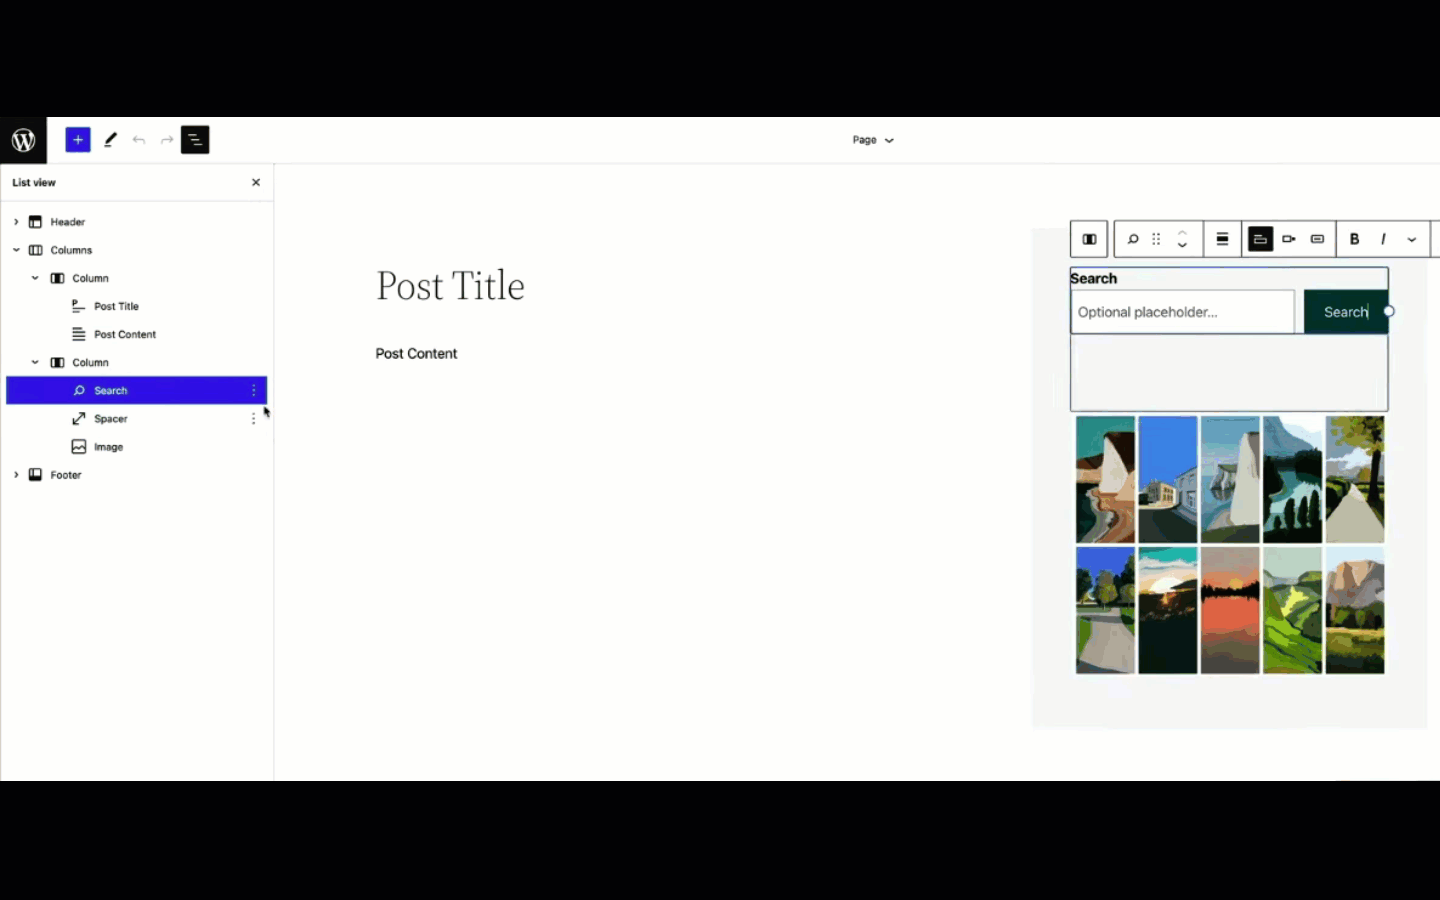
Now we need to add the content into the layout that we’ve just designed. Start by adding the Post Title block into the left-hand column block. Directly underneath that, you can add the Post Content block by typing /postcontent to find the block. Make sure to click Save, at the top right of the page. At this point, when viewing the actual site, there should be some content on the left of the page and a blank space over on the right, which will soon become the sidebar.

So now all we have to do is add the content into our sidebar. You could start by adding a Search box onto the right side of the page by clicking the add block icon and typing in Search. Add more content underneath, by selecting the block, clicking the options icon in the List View, and choosing Insert after. You may decide to leave a gap underneath it by adding in a Spacer block. Then, remembering to click Insert After again, you can insert an image block underneath that. However, you can add any blocks into the sidebar that you want, depending on what you want your site to look like. Remember to click Save, and when you refresh your actual page, you’ll see your sidebar appearing on every single page that’s using that template. As this is the default page template, this layout will appear for all your pages.
How to Style Sidebars
Styling sidebars is an easy process, as we are using blocks. Return to the page template that we previously created and use the List View to select the right-hand Column (this will be the second column displayed in the List View). After selecting it, a list of block options will be visible in the Settings panel on the right side of the page that you can use to modify it.

You can also edit the settings for any block added inside a column. For example, you can change the Background colour of an image block or add Padding (which will increase the space between the blocks and the column). Now, when you save it, go back to your page and reload it to see the updated changes that you’ve made.
How to Add a Sticky Sidebar
A sticky sidebar will remain in a fixed position as the page is scrolled down. To implement a fixed sidebar we’ll be using a free plugin called Sticky Block for Gutenberg Editor. You can install this plugin as you normally would for any other plugin.

Once installed, go to the Site Editor and find the Page Template that you’ve already been editing. Start by clicking the List View again, which will show you a clear view of what you’re building. As we are only making changes to the Column block, it may be helpful to collapse the header and footer within the List View.
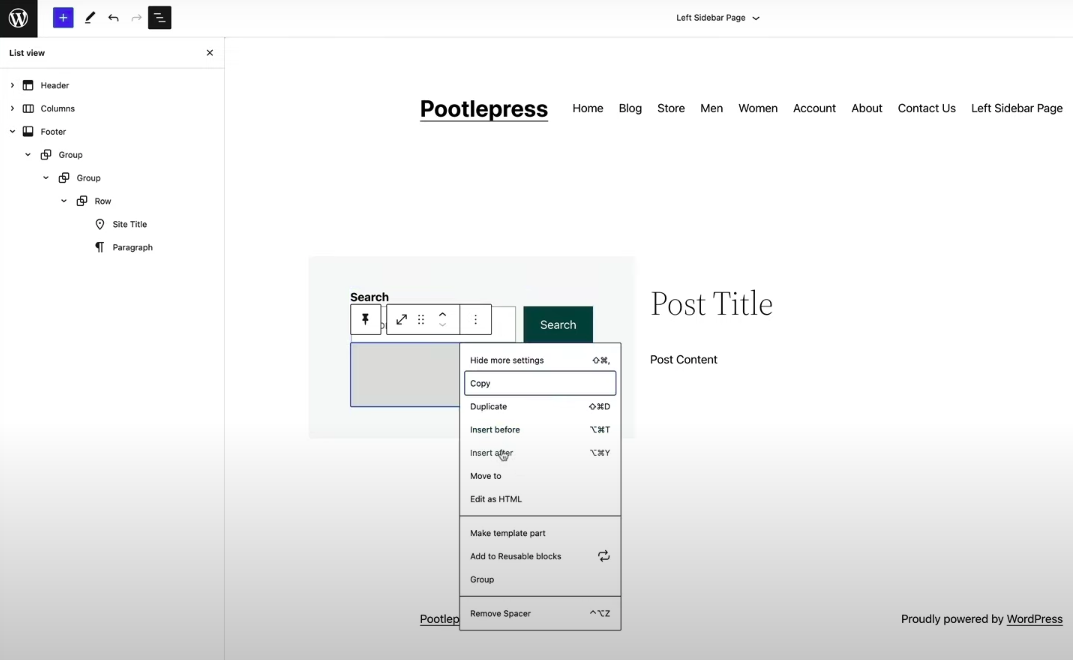
What we need to do is add the Sticky Block into the actual column, as it comes self-contained in its own block. We also need to put the blocks that are already included within the right column block (Search, Spacer, and Image) as sub-blocks of the Sticky Block.
In this example, our column contains a Search, Spacer, and Image block within the second column. Clicking on the Search block, scroll down to Insert Before, which gives us the space to add a block at the top. This is where we can add our sticky block, by typing /sticky.
This acts as a container block, so, by itself, it’s not doing anything. In order for it to work, we need to add the sub-blocks underneath it. In the List View, you can drag and drop each block into the Sticky block.

That means that those sub-blocks are now contained within the Sticky block. Over on the right, you’ll see options for the Sticky block in the Settings panel. This will include mobile settings, for example, changing the space between the Sticky block and the top of the screen. After saving it, you’ll be able to view the sidebar on a live page. As you scroll down, the Sticky block will be fixed to the top of the page and your readers can continue scrolling through your content.
How to Add Dynamic Sidebars
Dynamic sidebars allow you to have different sidebars on different pages and also in different positions on the page. To do this, there are three main steps:
- Create a new Sidebar Page Template.
- Swap Columns around (to change the position of the sidebar).
- Set the new page to use that Template.
This process will improve in a future version of WordPress. However, we need to start by creating a new Page Template. Over on the right in Page settings, you should see a Template option.
Clicking New will allow you to create and name a new custom base template to use. Now you can exit this and go back to the Site Editor. There, you can click the WordPress logo in the top left of the screen to view your recently made page template.
A way to save time is to open your previously made sidebar page template into a new tab and then copy the whole columns block, including sub-blocks. You can copy these into your new Page template so that you don’t have to start from scratch. To do this, select the Column block in the List View, click the three dots, and then Copy.
Then go back to templates and click on your newly made template (left sidebar page). What you can do is create the page template from scratch by deleting the existing blocks from the List View, leaving you with the default Paragraph block. Click the options icon on the Paragraph block and select Insert After. As the page is blank, you may decide to add a Header (which can be either existing or new). You can now delete the Paragraph block.
How to Add a Left Sidebar
Under the Header on your template page, you can add a new block by clicking the options icon on the Header block in the List View and selecting Insert After. In this space, you can now paste your copied columns block. Depending on where you want the sidebar to be, you may want to change the positions of the columns around. After selecting the column, you are able to use the arrows in the toolbar settings to switch the column position on the page to the left. By clicking save, it will create that page template with a left sidebar.
How to Use The Left Sidebar
Over on the Page Settings on the right, you’ll need to choose the new template that you’ve added (Left Sidebar Page). Click Publish at the top right corner and that page will now be showing the sidebar on the left. This is useful as it means you can choose which pages will show which sidebars.
How to Have Different Content In Different Sidebars
You can change what you show in the sidebar, by going back to the page template (Left Sidebar page template). Making sure you have selected the sidebar, you can easily delete any blocks within it by pressing delete. You can also add a block by pressing the three dots and selecting Insert after.
Make sure to save after making any changes. The pages that use the left sidebar page template will see the changes, whereas your other pages will have the sidebar in a different position with different content.
Conclusion
This article has looked at adding and styling different sidebars in Gutenberg WordPress, using the Twenty Twenty-Two block theme. Hopefully, you have a better understanding of how to use sidebars.
Leave a Reply