Looking for an easy way to customise your WooCommerce shop? What about webhooks?
Hooks are used to easily change or add code snippets without editing the core files of your WooCommerce site. Developers use them extensively throughout WordPress and WooCommerce to make advanced customisations. In addition to this, they’re also useful to non-developers to greatly simplify things.
In this tutorial, we’ll show you how to add hooks to WooCommerce in an easy, non-risky method that is perfect for non-coders.
Using shop page hooks in WooCommerce
While WooCommerce is one of the most popular e-commerce platforms that’s used by people all over the world, you will still need to use hooks to expand your possibilities and develop a customised solution for your online store.
Let’s go over some of the benefits of using shop page hooks and other hooks in WooCommerce:
- Facilitate navigation. Using shop page hooks and other hooks (e.g. archive page hooks and product category page hooks) in WooCommerce is a great way to simplify navigation on your e-commerce store, especially for new site visitors. You can use shop hooks to display additional information about product pages or choose how many products to display per row on the shop page.
- Give easy access to the shop and product pages. You can display additional products or showcase product upsells when a customer lands on a specific product page. This is also a great way to give easy access to the shop and product pages as well as encourage customers to spend more on your online store.
- Offer a seamless WooCommerce cart page and checkout page experience. Using shop page hooks in WooCommerce also lets you offer a smooth cart page and checkout page experience. You can display additional details about the product in the cart and show users additional information about their order’s shipping or payment details.
How hooks work in WooCommerce
Hooks are used for completing your WordPress site’s custom code that you may have used to implement additional functionality on your site. In simpler words, hooks are used to run your custom code or add features to your WordPress site without having to touch the core HTML files.
You can group together your custom code with a Callback Function and assign a hook to it. This way, whenever you use the hook, the Callback Function will run your custom code on the front-end of your WordPress site.
However, it’s important to understand the difference between the two main types of hooks:
- Action hooks. Action hooks are used to do “actions” or execute commands at certain predefined points in the WordPress runtime.
- Filter hooks. Filter hooks allow you to modify any data that is processed by WordPress and return it in the “Modified” state.
Due to the complex nature of how WordPress hooks work, it can become confusing for you to use them on your WooCommerce site. Action hooks and filter hooks are also commonly confused for being the same or having the same functions.
Action hooks are used to run custom functions from your WordPress core code while filter hooks are used to customise data that’s being used by other functions in your site’s code. Actions hooks can work with most types of tasks, including changing how your WordPress site works. On the other hand, filter hooks are only there to modify the data being sent to filters.
Additionally, another big difference between the two is how they look in your WordPress code file. Action hooks are represented or defined by the function do_action (‘action_name’) while filter hooks are created by using the apply_filters (‘filter_name’, ‘value_to_be_filtered’ ) function.
To add action or filter hooks to your WordPress site, you need to edit the code in your functions,php file, ideally in the header of the child theme. Here’s how it should look:
function add_action( $tag, $function_to_add, $priority = 10, $accepted_args = 1 ) {
return add_filter( $tag, $function_to_add, $priority, $accepted_args );
}
Why adding hooks manually is not recommended
As we’ve demonstrated above, adding hooks manually in WordPress can be a difficult process, especially if you’re not a coder. The process is very tedious and not at all recommended for those who don’t have extensive knowledge of the WordPress backend, coding, and web development skills.
This is very important to consider as there are countless moving parts in this process of manually adding hooks and even one slight error or incompatibility can result in your WordPress site breaking. Best practices suggest you should always add hooks to the child theme.
In this sort of scenario, you’ll face a bigger challenge: finding what caused your website to break down. Troubleshooting the error can again be tedious and risky in itself if you’re a non-coder.
To some extent, adding hooks to WordPress can be difficult. The good news is that, with the use of a plugin, it can become quite easy, even for a non-coder. By using a WooCommerce shop hooks plugin, you can let the plugin do all the tedious work of editing code for you while still letting you change the feel of your WordPress site.
WooBuilder Blocks by Pootlepress
A great example of a robust WooCommerce shop hooks plugin is the WooBuilder Blocks plugin by Pootlepress. It’s the perfect plugin to create any design for your WooCommerce shop or single product pages, without you having to touch a single line of code.
WooBuilder Blocks offer an all-in-one solution to creating any design for your WooCommerce product pages. This means that it lets you customise individual product pages and make them look exactly how you want.
The best part about WooBuilder Blocks is that it works directly from the Block Editor, an interface you are probably already familiar with. You can create products as you would normally and customise the product using the WooBuilder Blocks Editor.
It also includes all the WooCommerce Product Blocks that you need to design your shop’s single product pages in any way you like. Within a few minutes, you can create attractive product pages that help your WooCommerce products stand out. In addition to this, you can also save your custom-created WooCommerce templates and apply them to multiple product pages on your site quickly.
How to add hooks and customise your website using WooBuilder Blocks
Creating hooks and customising your WooCommerce site with WooBuilder Blocks is very intuitive, even if you don’t have experience with coding.
Let’s dive deeper into how you can add hooks to your website using WooBuilder Blocks.
Step #1. Install and activate the WooBuilder Blocks plugin
Once you purchase a copy of WooBuilder Blocks, you will receive an email containing your license key and the download link for the plugin. Click on the download link and save the .zip file on your device.
Now, navigate to Plugins → Add New and upload the .zip file to the meta box and click the Install Now button. With the plugin installed, navigate to Plugins → Installed Plugins and find WooBuilder Blocks and click on the Activate License button. Enter your license key in the text field and click on the Activate License button to continue.
Step #2. Add hooks to your product page
With the WooBuilder Blocks plugin activated, navigate to your product’s edit page and you will see the Enable WooBuilder Blocks button under the Publish meta box.
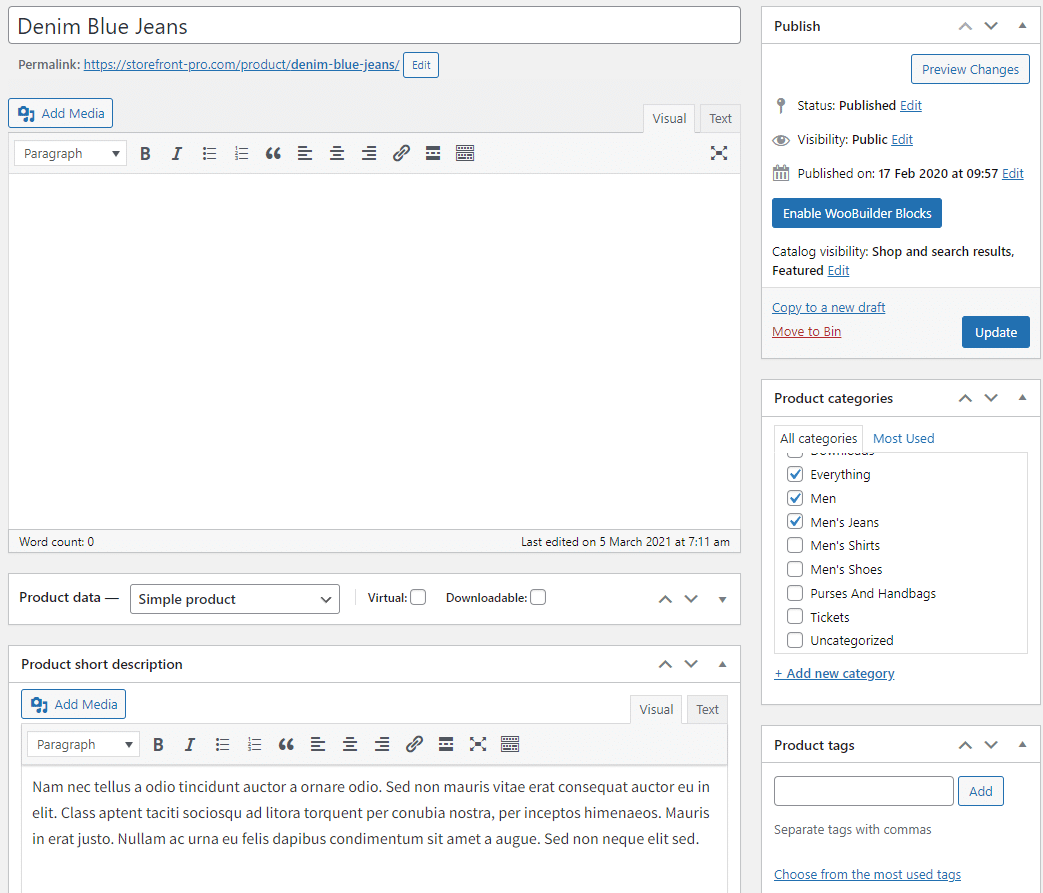
Once you click on it, you will be prompted to either start creating a product from scratch, choose a pre-built WooCommerce template file to start with, or choose from your own custom templates. Select the Pick a template option to start creating your product page with WooBuilder Blocks within a few minutes.
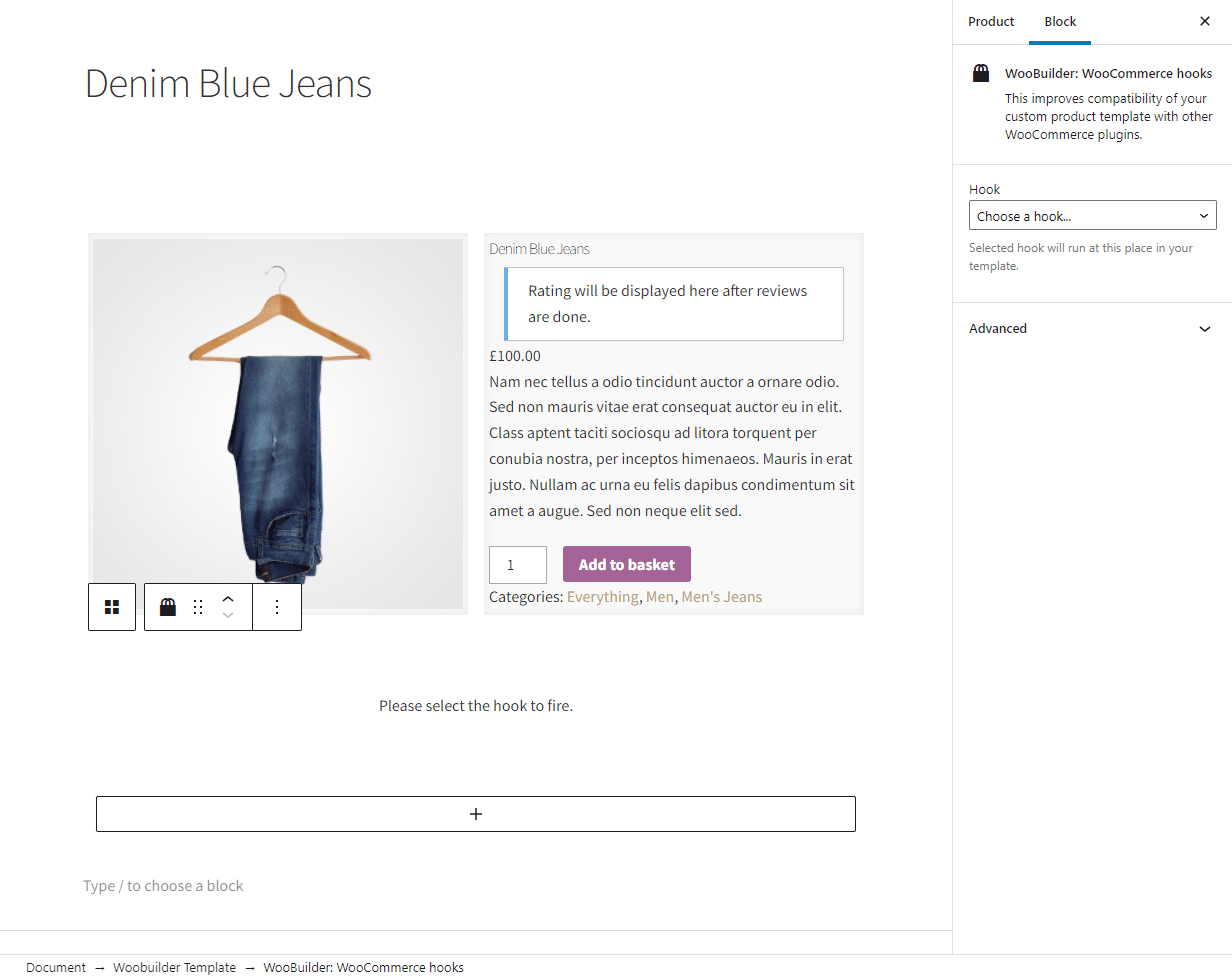
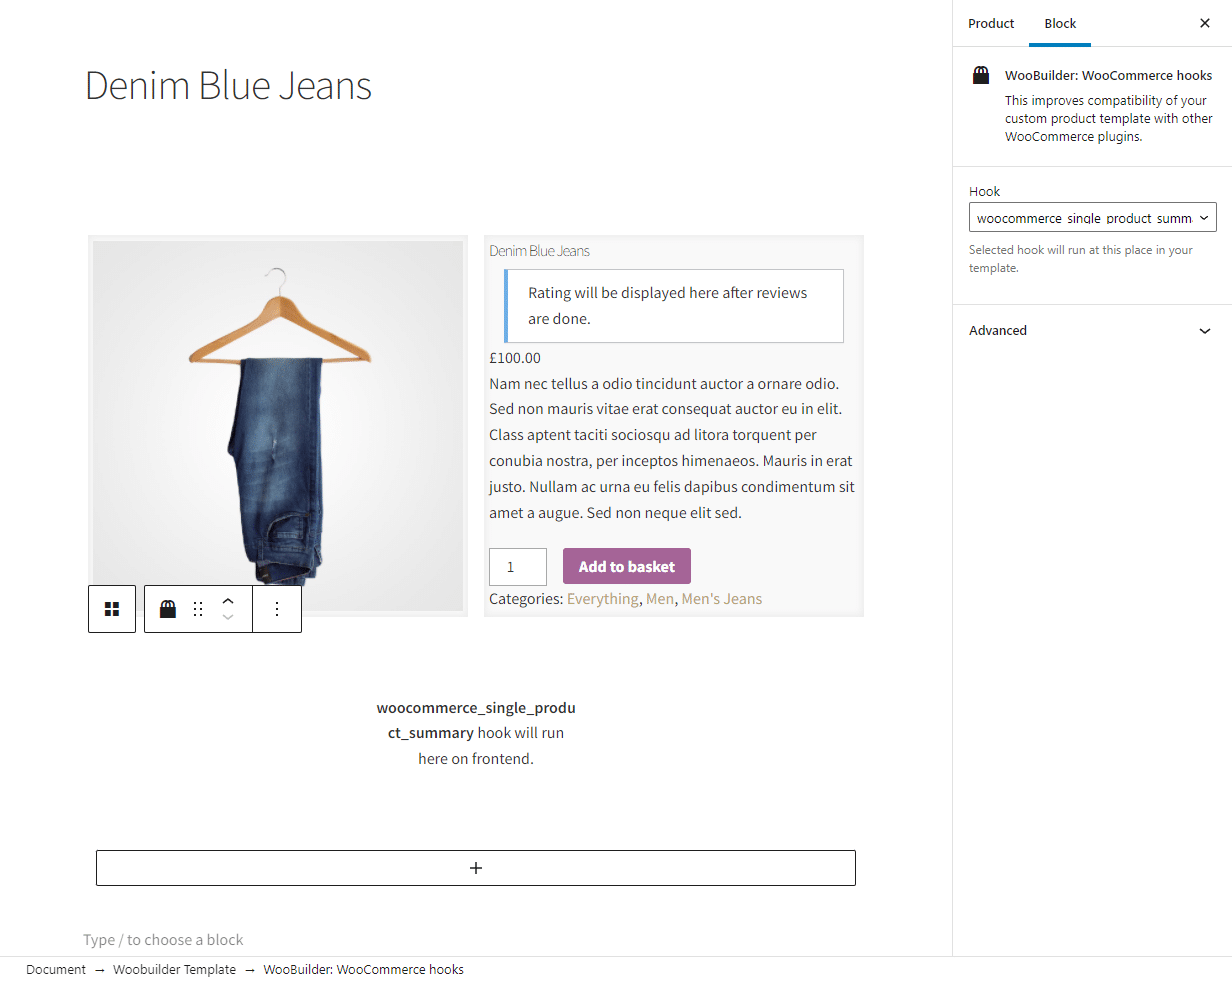
Once you’re done selecting the template, click on the “+” icon and find the WooBuilder: WooCommerce hooks and add it to your product page. Now use the dropdown menu to choose your Hook from the three options.
Step #3. Customise your product page
WooBuilder Blocks also lets you fully customise the feel of your product pages on the front-end. With the hook added to your product page, you can also add other WooBuilder Blocks to further customise your WooCommerce product pages. Some options might let you modify other on-page elements such as the WooCommerce cart button.

For example, you can display a product image carousel on the product page to draw attention to it. Click on the “+” icon and add the WooBuilder: Product Images Carousel block on your product page. Click on the Update button to continue.
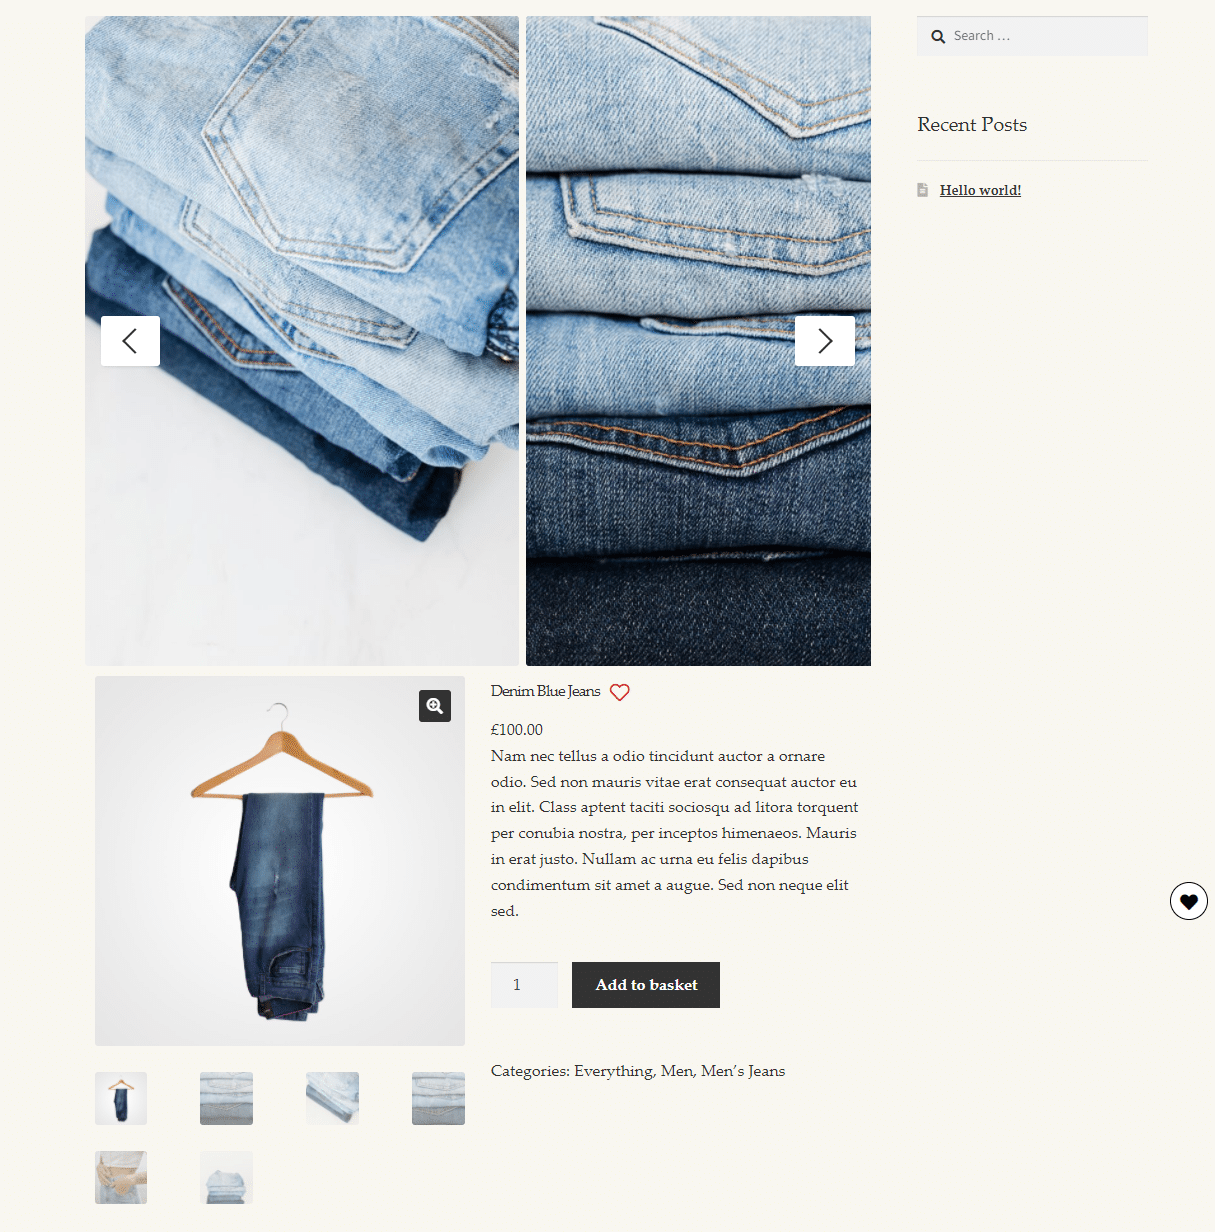
Step #4. Preview
This is how your WooCommerce single product page will look on the front-end with the product details and add to cart button:
Why you should use WooBuilder Blocks
WooBuilder Blocks offers one of the best options for customising the look and feel of your WooCommerce shop and single product pages, even for non-coders.
It gives you complete freedom to design the whole WooCommerce product page any way you like using the Gutenberg Block Editor. This is great for anyone who is already familiar with the interface of the default WordPress editor.
The WooBuilder Blocks plugin also lets you use existing templates to quickly get started and create an attractive product page within a few minutes. You can create your own templates so you don’t have to create product pages from scratch every time you want to add new products to your WooCommerce store.
The plugin out of the box comes with an extensive list of blocks that can help you add all kinds of functionality to your WooCommerce site. For instance, you can showcase products through galleries, add videos, and apply A/B split testing functionality. This not only helps enhance the shopping experience on your WooCommerce site but also helps you encourage more people to make purchases.
Last but certainly not least, it gives non-coders the same freedom that developers enjoy through extensive knowledge of code. This way, you can create professional-looking product pages for your WooCommerce store the same way a developer would, all using the robust plugin.
Conclusion
WooCommerce shop page hooks and other WooCommerce hooks play an important role in extending the functionality of your default WordPress site.
However, adding them manually to your code can be tricky as well as risky for your website. You don’t want to manually add hooks to your functions.php file only to find out it crashed your WordPress site.
Using WooCommerce shop page hooks is still important as they help facilitate navigation and make your WooCommerce site much more user-friendly. Ideally, you want to add hooks to your single product pages and be able to easily customise the feel of your WooCommerce site.
A great way to do this is by using a plugin such as WooBuilder Blocks to customise single product pages and add hooks. As a result, it can improve the user experience and encourage more customers to shop from your online store.
Ready to start easily adding WooCommerce shop page hooks and other hooks to your online store? Get WooBuilder Blocks today!
Leave a Reply