Are you looking to sell exclusive products to members or registered users? Look no further.
While WooCommerce is used to create all sorts of online stores, enabling catalog mode can help you go a step further. It allows you to create a “Members-only” area on your site and present customised versions of your online store to different users.
In this article, we’ll dive deeper into how you can enable the catalog mode in WooCommerce using the top plugins. We’ll also show you how to further customise your WooCommerce store.
Why should you use catalog mode?
Depending on your brand and the type of products you sell, enabling catalog mode can help you enhance the customer experience on your WooCommerce store.
By offering personalised products for only specific user roles on your website, you create a sense of exclusivity for your products. This means that users will have to register themselves before they can access the restricted product categories or related products and add them to their cart.
Using catalog mode, you can show different versions or customised variations of your WooCommerce store to different users. For instance, you can create a subscribers exclusive area on your WooCommerce site where you offer premium products to certain user roles only.
In addition to this, enabling catalog mode on your WooCommerce site also lets you create and run a membership store. You can create multiple membership tiers and offer customers products based on their membership level. This is a great way to encourage casual visitors and unregistered users to create an account and become members of your WooCommerce site.
As a result, you boost customer loyalty and create a sense of community around your brand. You also increase the chances of conversions by encouraging people who are interested in your product to register on your WooCommerce site. Once they’ve committed to doing that, there’s a higher chance that they’ll complete a purchase.
How to enable catalog mode in WooCommerce
WooCommerce by default offers limited customisation options for enabling the catalog mode on your WooCommerce store. Instead, you can use a WooCommerce catalog mode plugin like WooBuilder Blocks.
WooBuilder Blocks is a powerful plugin that gives you full control over the look and feel of your WooCommerce product pages. It lets you customise how you display your products in your ecommerce store and is highly recommended by WordPress experts.
It offers one of the easiest ways to customise WooCommerce product pages using the Gutenberg editor and make them look the way you want, as pointed out in this expert review:
‘WooBuilder Blocks is an easy way to manage your WooCommerce Product Page Design with the Gutenberg editor – great for leaner WordPress websites.’ – Paul Charlton (WP Tuts).
There are many WooCommerce catalog plugins to choose from but WooBuilder Blocks is one of the best options available. It gives you complete freedom to customise your WooCommerce product pages and fit in with your brand. This helps you offer a unique shopping experience on your WooCommerce store.
In addition, WooBuilder Blocks is beginner-friendly and lets you customise just about anything through the Gutenberg editor, which is really useful for people who aren’t very experienced with coding. The plugin also simplifies the creation of attractive WooCommerce pages using pre-designed templates. You can choose from various templates to start with or you can start from scratch and create your own unique template.
WooBuilder Blocks offers a robust solution for showcasing your WooCommerce products in attractive galleries, videos, and product slideshows. This not only helps improve product visibility but also gives your WooCommerce site a more professional look. Using the robust plugin, you have access to over 20 different blocks that offer unparalleled customisation options.
In the tutorial below, we’ll show you how to enable the catalog mode in WooCommerce using WooBuilder Blocks.
Let’s start off by installing and activating the WooBuilder Blocks plugin on your WooCommerce site. Navigate to Plugins → Add New and upload the zip file into the meta box and then click on Activate this plugin link.
Now that we’ve activated WooBuilder Blocks, we can start creating catalog products. Go to Products → Add New and then click on the Enable WooBuilder Blocks button.
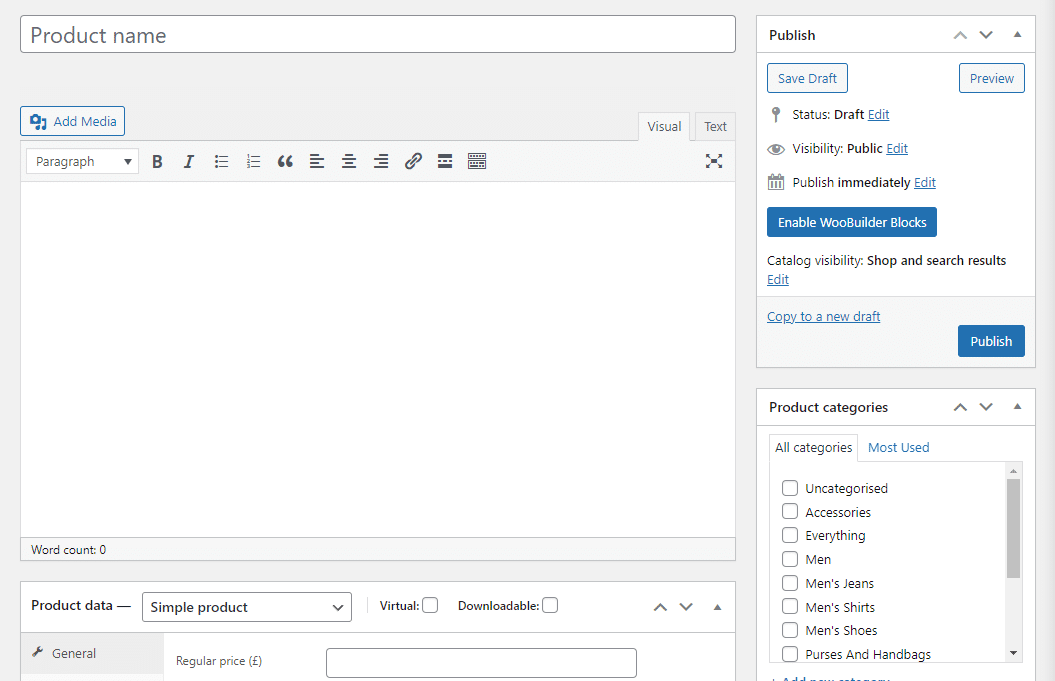
This will automatically redirect you to the WooBuilder Editor. Click on the Add New Block button, select Woobuilder Template and choose a layout for your product. We’ve selected the Classic template.

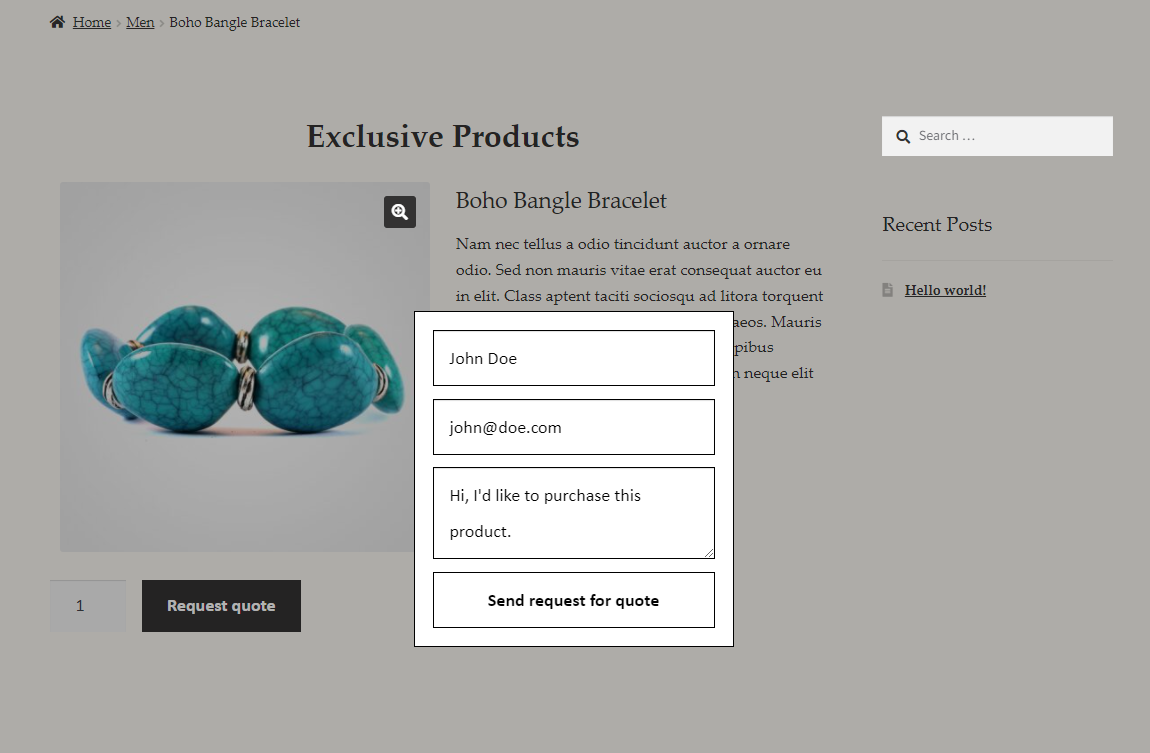
After setting product details, you can remove the price tag and let users request a price quote by submitting their name and email. Add the WooBuilder: Product Request Quote Block to let users submit a request. You can also customise how your product looks and add custom text to encourage customers to quickly register with you.
Once you’re done, click on the Publish button to continue.
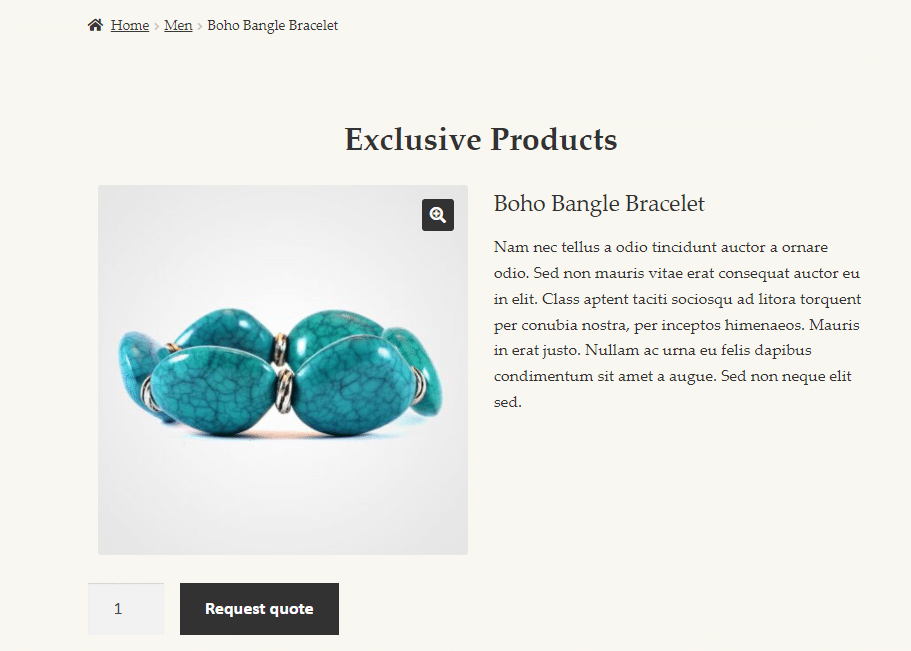
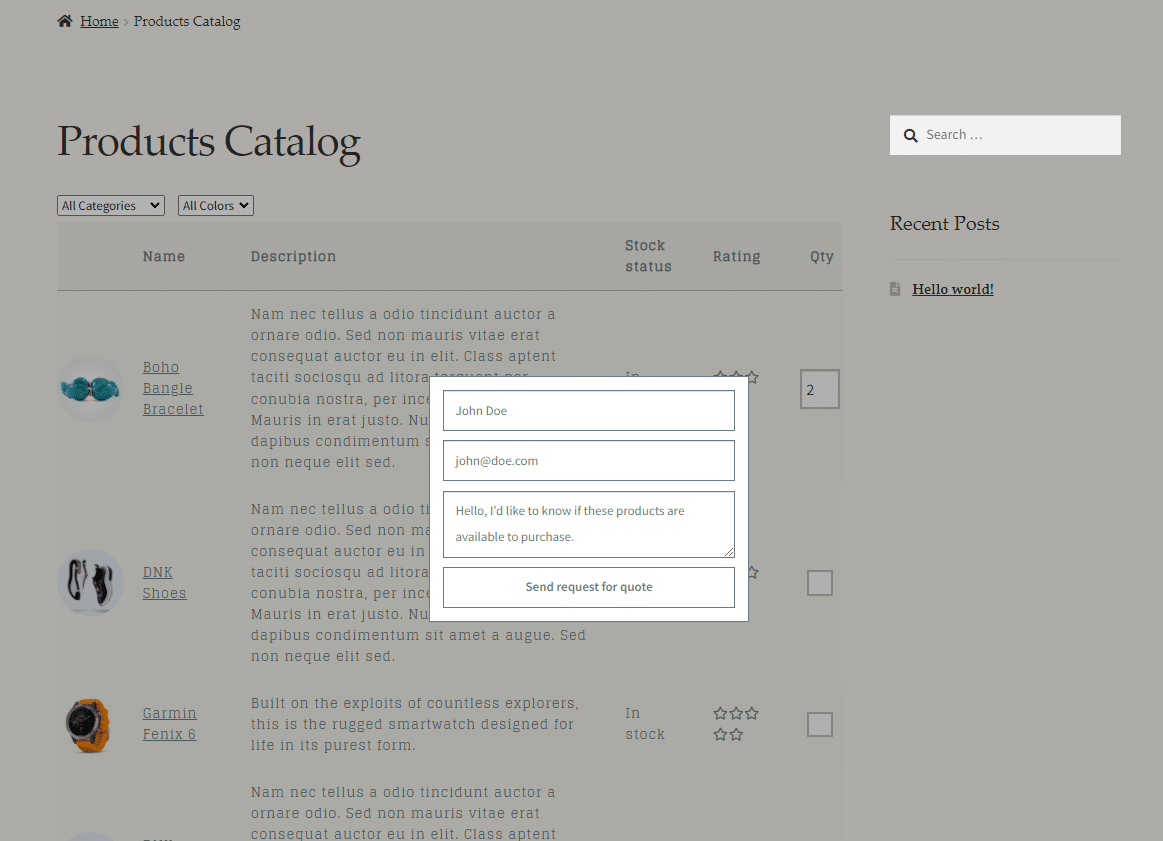
Customers will be able to see the Request a quote button on single product pages instead of the add to cart button. When customers are interested in a specific item and want to know the product price, they can submit a request by entering their name, email, and message.
How else can you customise your WooCommerce store?
Other than using WooBuilder Blocks to enable catalog mode, you can also use the Storefront Blocks plugin to further customise your WooCommerce store.
Storefront Blocks lets you fully customise your WooCommerce shop and category pages using the Gutenberg Editor. You can create stunning WooCommerce pages that showcase your products better and improve the shopping experience on your online store.
With Storefront Blocks you can change your WooCommerce store’s shop page, the home page, and category pages so that they can be used as product catalogs. This is a great way to let customers browse through all your products in a sortable product table.
In addition to this, Storefront Blocks is perfect for extending the functionality of your WooCommerce store and gives you the ability to customise your store’s design in any way you want. It offers premium Gutenberg blocks to create beautiful WooCommerce pages and gives you full control over the layout and design of your page. The best part about Storefront Blocks is that it integrates perfectly with all themes using Gutenberg.
Thanks to a suite of powerful blocks including the FlipBook Block, Product Table Block, Masonry Block for Products, Carousel Block, Square Grid Block, and the Slider Block, the customisation possibilities are endless with Storefront Blocks.
Let’s go over how Storefront Blocks lets you create catalogs on your WooCommerce store.
Start off by installing and activating the Storefront Blocks plugin on your WooCommerce site. Navigate to Pages → Add New and give your catalog page a new title.

Now add the Products table Block under the Storefront Blocks section. Click on the block to view additional settings.
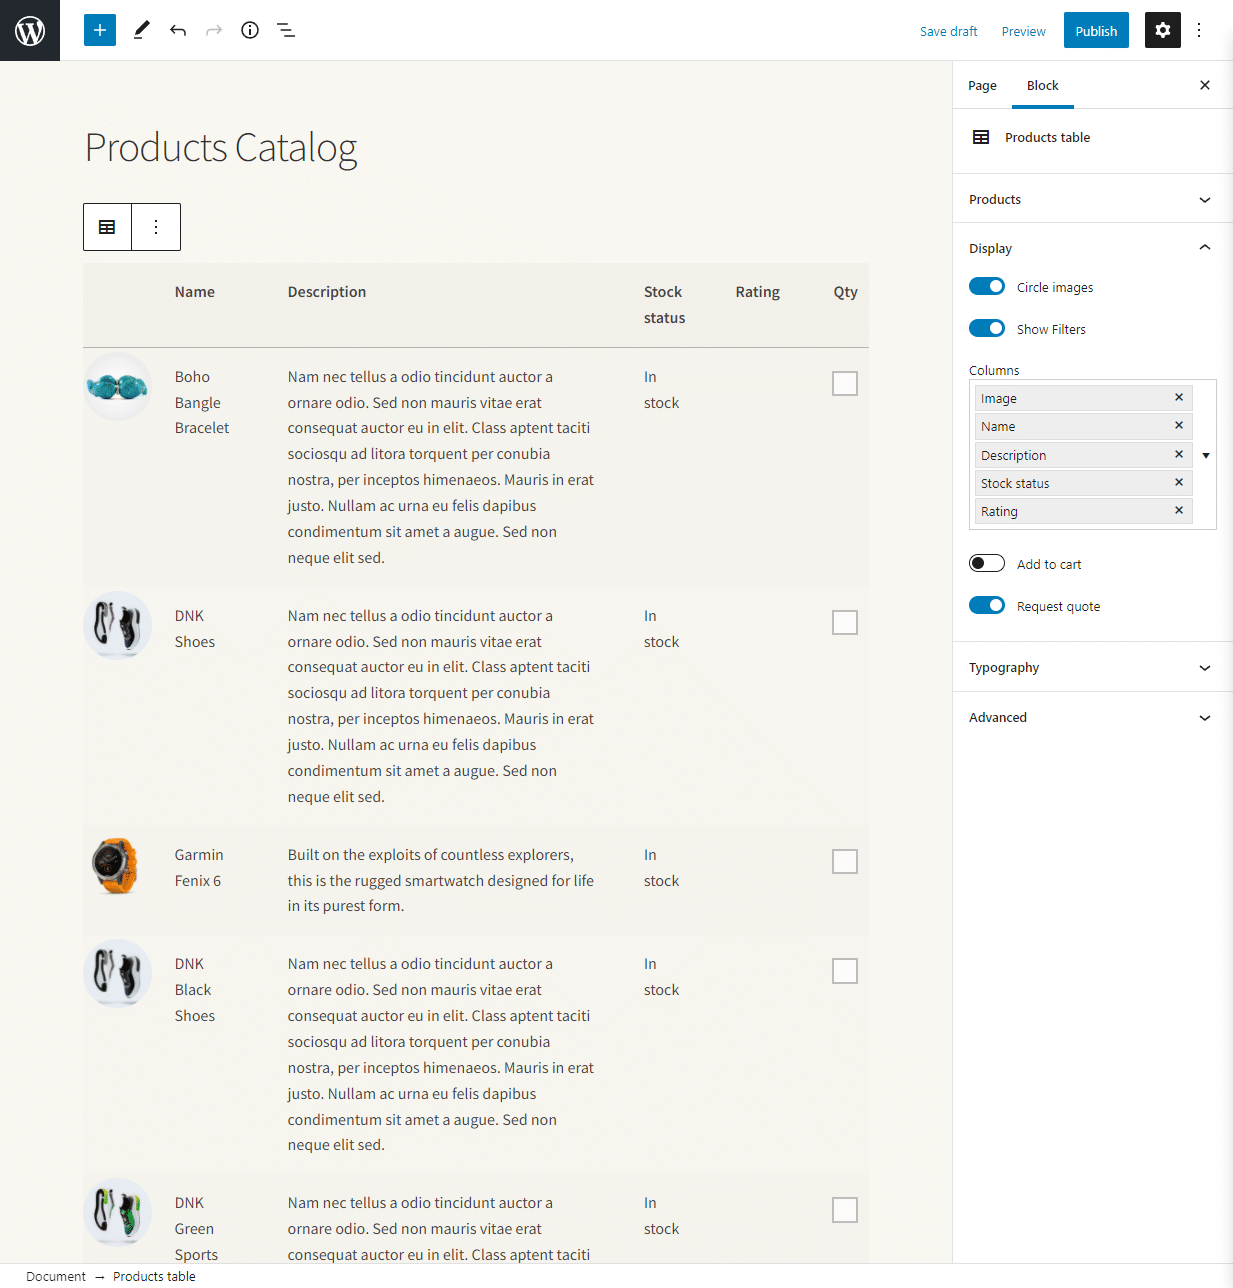
Using the Display section, you can add and remove Filters from the product table. Remove the Price filter and select the Request quote checkbox. This will let users browse through your product selections and submit a request to buy the product using the button at the bottom of the product table.
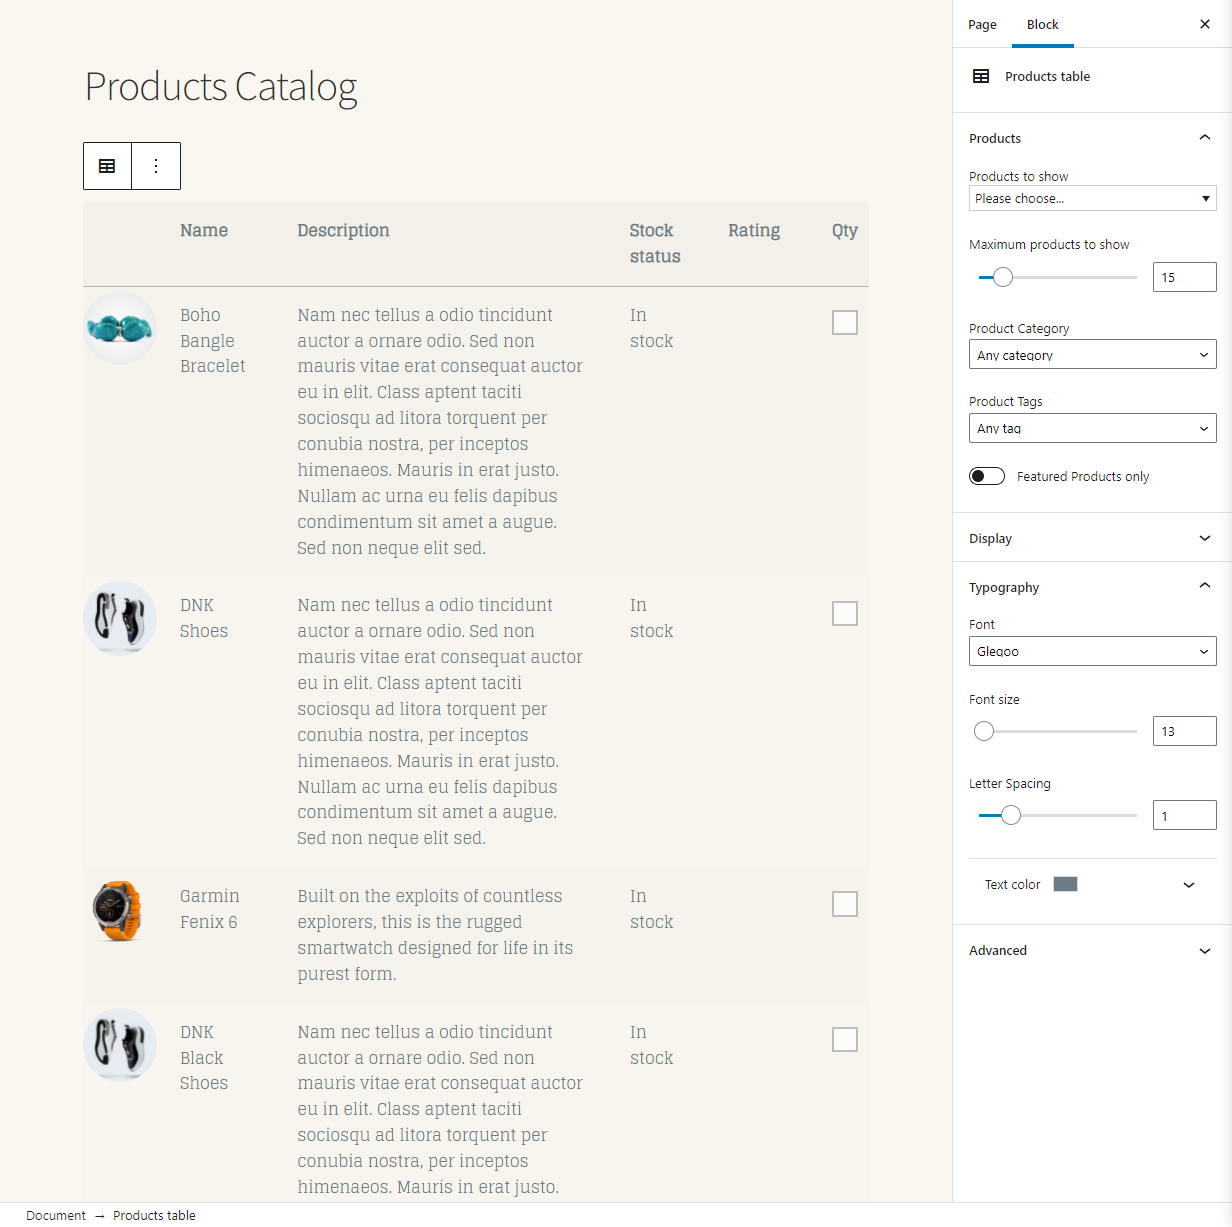
Using the Products section, you can set which products should be displayed in the product table. You can select specific products from a particular category or only display products that have a specific tag. In addition to this, you can also customise the typography settings for your WooCommerce catalog page. It lets you change the font style and set the font size and letter spacing. Once you’re ready, click on the Publish button to continue.
Shoppers in your WooCommerce store will be able to browse your product catalog and select multiple products at once for requesting a quote.
It’s important to note that while Storefront Blocks helps you extend the functionality of your WooCommerce store, it’s in no way a replacement for WooBuilder Blocks. Using Storefront Blocks, you can create catalog pages for products on your shop’s home page, category pages, and single product pages.
On the other hand, WooBuilder Builder lets you customise and create catalog products on your online store. This is useful for offering customers exclusive products based on their user role. For instance, you can only let users who sign-up on your membership site access exclusive products. They can submit a request to buy your WooCommerce product. This gives you an easy way to identify registered users or members and grants them access to the exclusive, premium product.
Conclusion
WooBuilder Blocks and Storefront Blocks are two separate plugins that can help you enhance your WooCommerce store and take it to the next level. You can create better designs and layouts for your WooCommerce pages according to your brand. As a result, this can help improve the conversion rate and boost sales on your WooCommerce store.
Using the robust plugins, you can also optimise your WooCommerce shop pages for SEO. This is far better than using the default WooCommerce pages as it can help your shop pages rank higher in SERPs. This way, you not only improve product visibility but also help attract new site visitors to your WooCommerce store.
If you’re looking to enhance your WooCommerce store, you can use Pootlepress premium WordPress plugins, themes, and training courses. This is especially useful if you’re just starting out and want to create a professional-looking WooCommerce site.
Ready to start showcasing your WooCommerce products in catalog mode? Get Storefront Blocks and WooBuilder Blocks today!
Leave a Reply