Updated 16th March 2021
Here’s something I’ve never done before…a beginners Guide to building a WooCommerce Storefront Website from start to finish.
Time needed: 40 minutes.
What you will learn
- How to get started by installing WordPress
- How to set up your Storefront theme
- How to install the WooCommerce plugin
- How to customize WooCommerce with our Storefront Pro plugin
- How to optimise your website for SEO
- How to set up the WooCommerce Storefront home page
- How to set up your WooCommerce Storefront blog or news page
- How to add a contact form to your WordPress site
- How to set up a WooCommerce Storefront stunning home page
- How to build a WooCommerce shop
- How to add products to your shop
Video transcription
- Set up WordPress and WooCommerce Hosting
- Installing WordPress on a temporary domain name
- Login to your new website
- Check Permalinks and Site Title
- Change your WordPress Theme
- Installing the WooCommerce Plugin
- Setting up WooCommerce Payment Gateways e.g Stripe and Paypal
- Sourcing Royalty-Free Photos
- Create the Storefront Home Page
- Creating the navigation menus
- Adding a photo to the Home page
- Add a slider to the Storefront Homepage
- Further customising the Storefront menu
- Adding WooCommerce Products
- Customize the WooCommerce Shop Page
- Hide the WooCommerce add to cart button on the Shop Page
- Add a WooCommerce contact page and form
- Add a Blog to WooCommerce
- Customize the WooCommerce Storefront Blog page
- Customize the WooCommerce Footer
- Create your own WooCommerce Store today!
Beginners Guide to building a WooCommerce Storefront Website from start to finish
In this tutorial, we’re going to be creating a complete WooCommerce website from scratch.
I’ll take you through every single step you need to take to build your own website using WooCommerce with the Storefront Theme and our own Storefront Pro plugin.
You can either follow along with the video at the top of the page, or keep reading to see how you can do it yourself in just 35 minutes!
Set up WordPress and WooCommerce Hosting
The first thing you’ll need to do if you want to build a new site is to choose a hosting company.
Although WordPress is freely-available, open-source software, you don’t need to download WordPress to your computers.
Instead, you’ll set up a site on your chosen hosting company and install WordPress there directly .
For the purposes of this demonstration, I’m going to use GoDaddy, but there are plenty of other good hosting companies, such as WP engine, who I highly recommend for those on a higher budget, or BlueHost if you’re based in the US. If you’re based in the UK, you might want to try Heart internet.
Whatever hosting provider you choose, the first step is to select a plan to get your WordPress site installed at your hosting company.
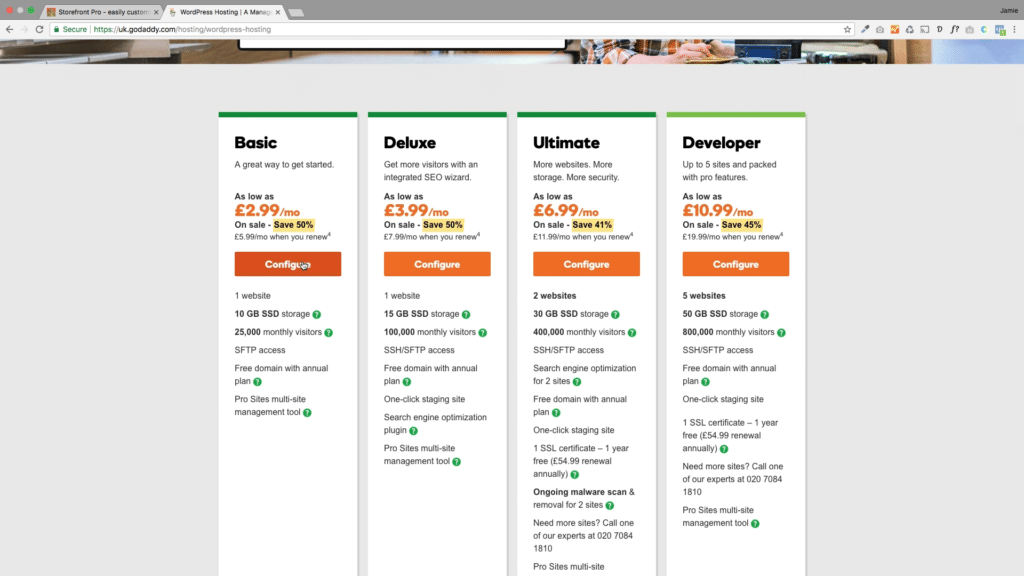
For the purpose of this tutorial, we’ll just go for the basic level, which will be fine for most sites to get you going. You can ignore the various things they’ll try and up-sell you as you go through the purchase process!
If you’re starting your own site you’ll want your own domain name and a service period that suits your needs. In this instance, I’m going to choose ‘no domain name’ just because it’s a demo.
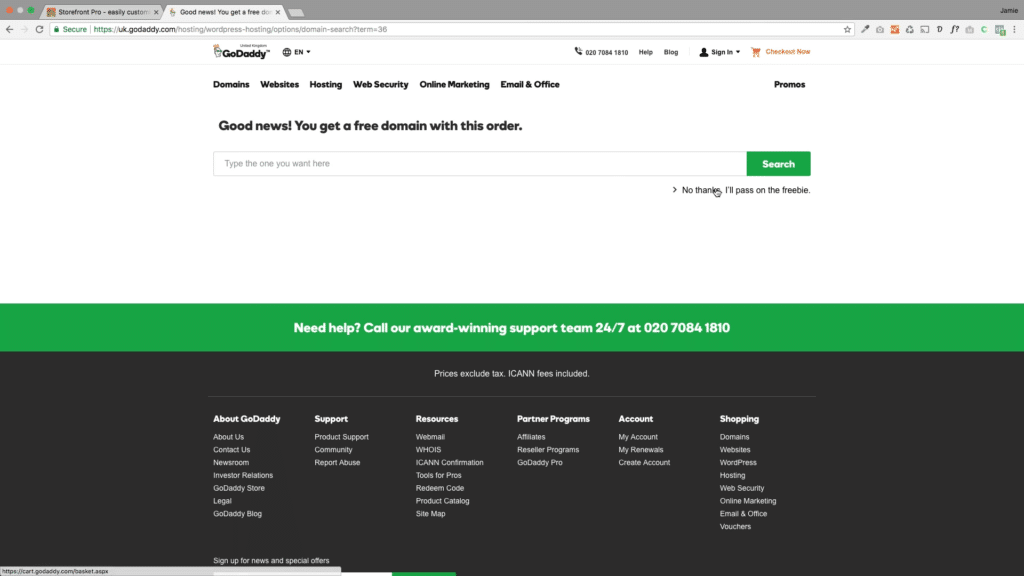
Installing WordPress on a temporary domain name
For the purposes of this tutorial, I’ll be installing this on a temporary domain name, but you can find out how to link this temporary domain name to your permanent domain name here. Alternatively, if you don’t have an existing domain name, you can simply buy one now.
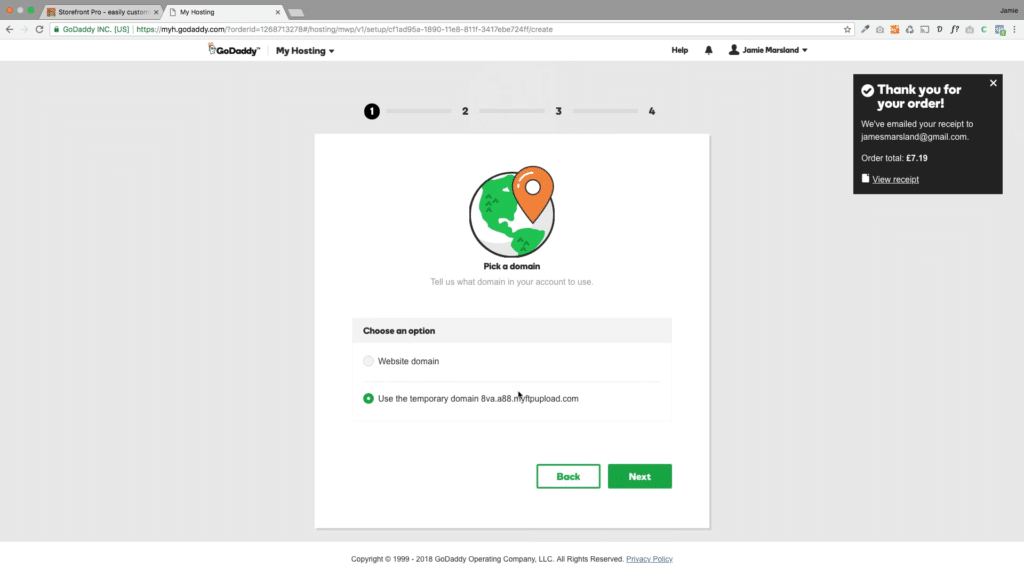
After we’ve set up the domain, all that’s left to do is install WordPress. Simply click install WordPress and it’ll be installed on the new site you’ve just bought. This should just take a couple of minutes.
Login to your new website
Next you’ll want to go to your WP admin panel and log in.
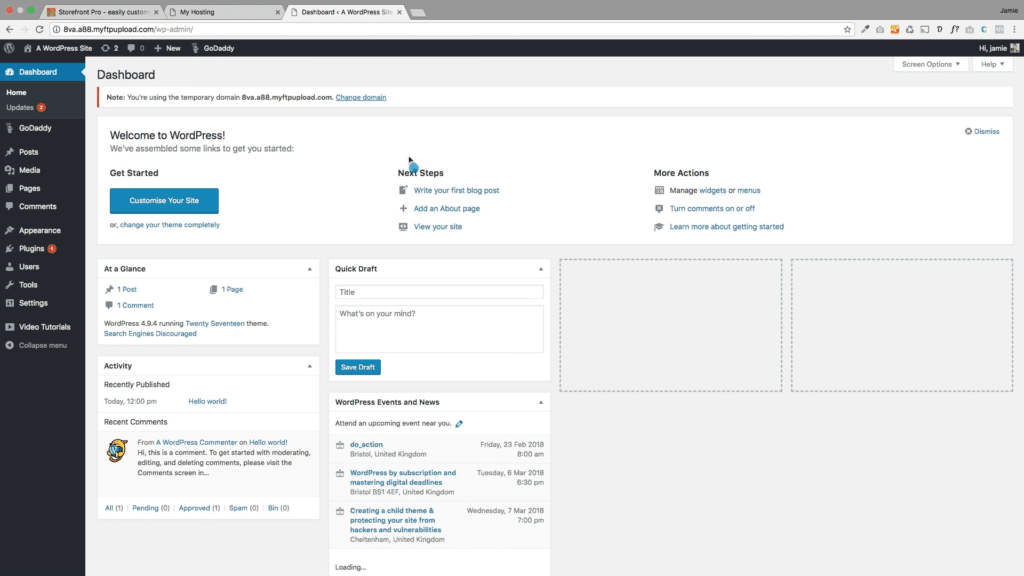
You’ll see that your new site is live and available for anyone around the world to access.
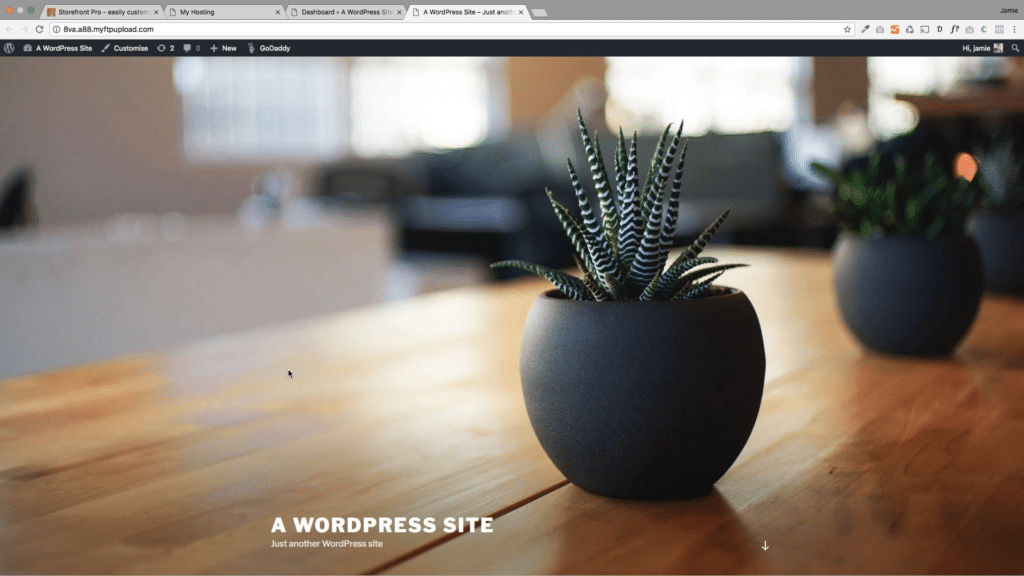
But there’s not really much there yet! So let’s get to building…
Check Permalinks and Site Title
Every page and post on your site will have its own individual web address – the permalink. However, by default, some hosting providers set these as “plain”, so you end up with post urls like “mysite.com/148yh91a” – which is terrible for your Search Engine Optimisation (SEO).
Ideally, each permalink on your site will be named logically after each page (e.g. “mysite.com/help”).
Thankfully, WordPress makes it easy to change your permalinks. All you need to do go to your WordPress dashboard, and click Settings > Permalinks. Here you’ll have a list of options to choose from – I’d recommend you select Post name.
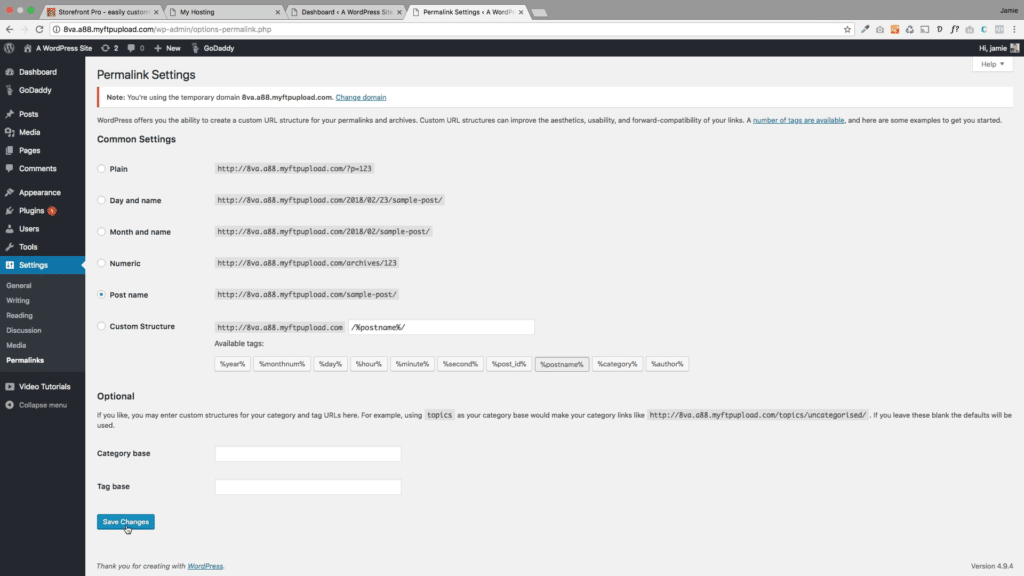
We’ll also want to change the Site Title to something actually relevant to your site. This is the text that appears at the top of the browser tab to let you (and search engines) know what the site is. By default, it’s simply set to “A WordPress Site”, which isn’t much good, so change it to whatever you like by going to Settings > General in your WordPress admin dashboard.
Change your WordPress Theme
By default, new WordPress sites come installed with that year’s default Theme (with a name like TwentyTwentyOne). Themes govern how your site looks and behaves, so they’re a core part of building your new website!
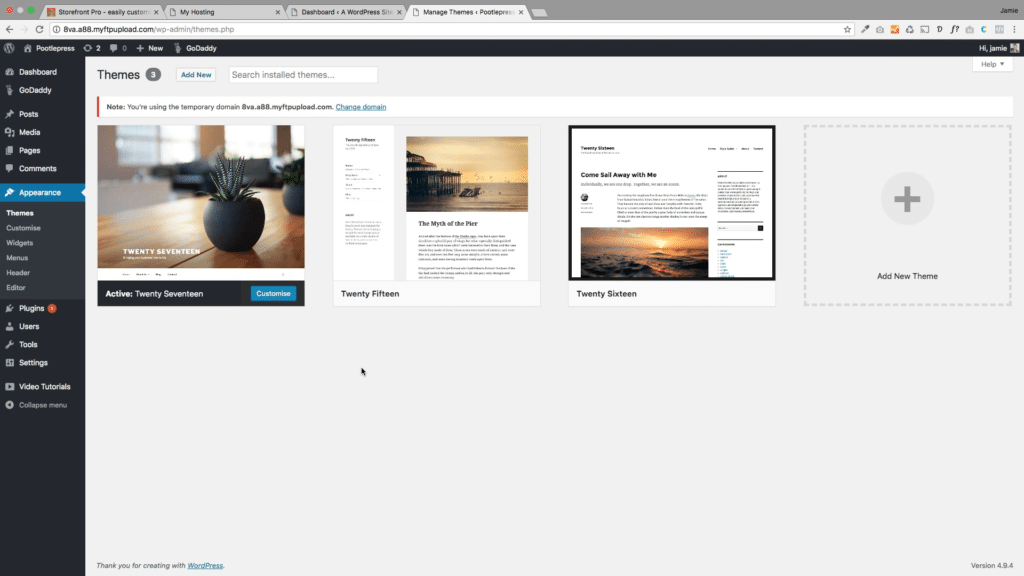
As we don’t want to build a “default”-looking website, the first thing we’re going to want to do is change this theme. So to add a new theme, there are two routes. You can either hover over your site title and click on Themes, or if you’re within your dashboard, you can just go to Appearance > Themes. You’ll then be able to search for and install the theme you want.
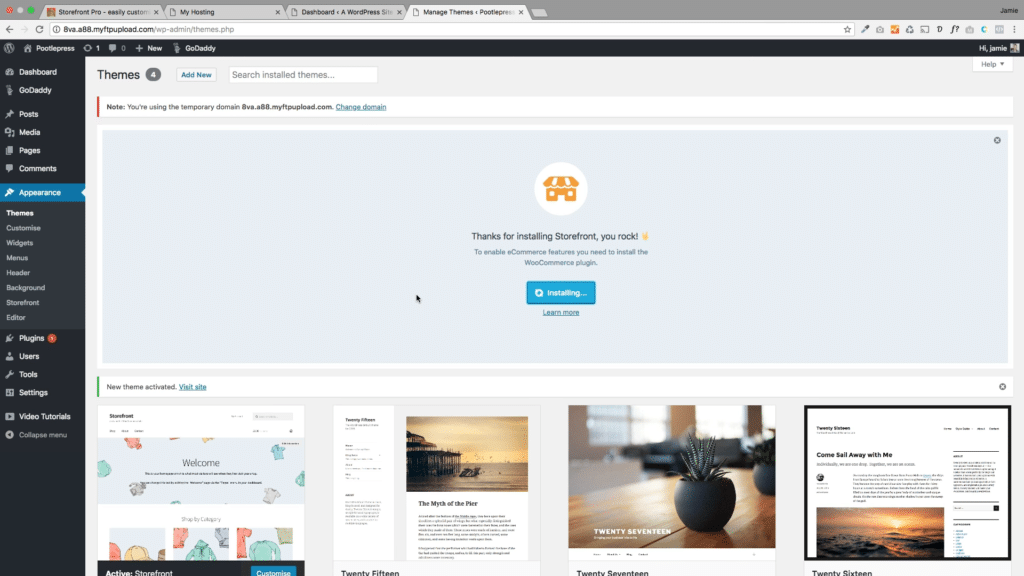
In this instance, let’s click on Add Themes then Popular Themes and find Storefront, which is a dedicated WooCommerce theme that’s perfect for building your online store.
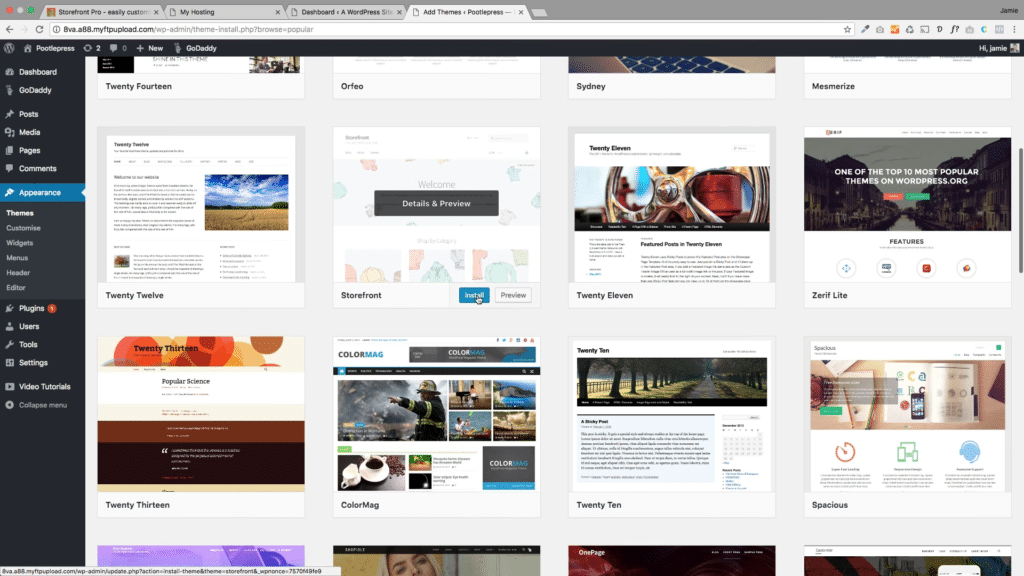
Go ahead and install and activate Storefront now.
Installing the WooCommerce Plugin
WordPress has some great functionality out of the box, but that doesn’t stretch to eCommerce by default. For that, we’ll need a plugin; WooCommerce.
Luckily, after you install the Storefront theme, it’ll prompt you to install WooCommerce straight away. So simply click Install and then Activate, and you’ll be taken to the WooCoomerce quick start page.
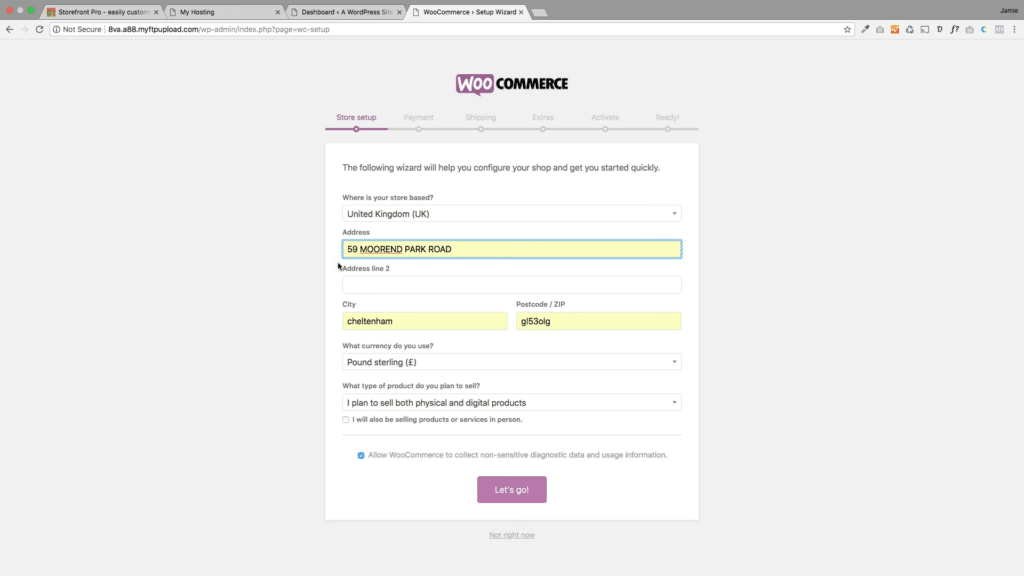
This little wizard will ask you things like your location, where you’re based, what kind of products you want to sell, whether you’re selling physical or digital products, or whether you’re selling both. You can come back and change all this information later, so don’t worry if your plans aren’t set in stone yet.
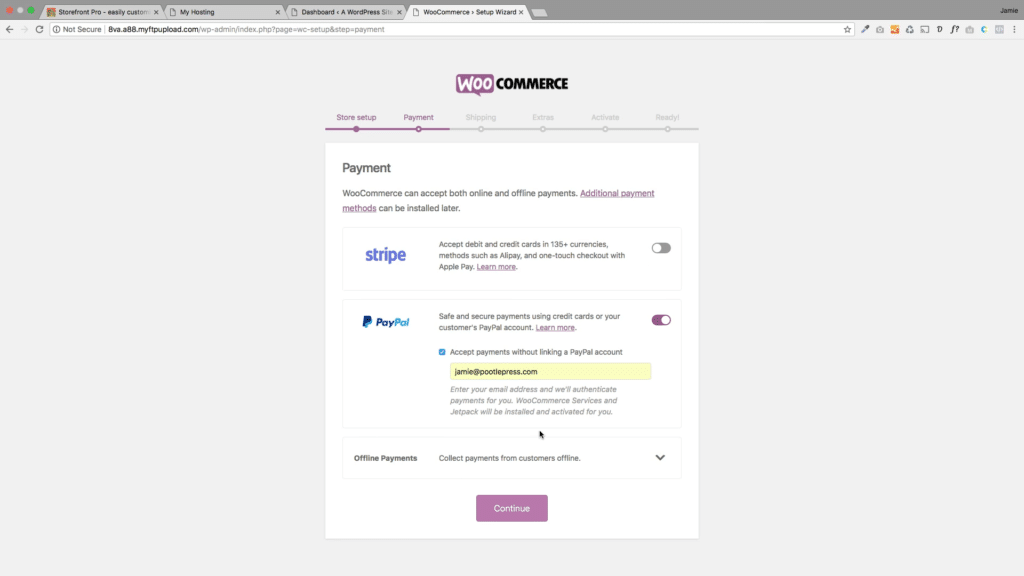
It will also ask you a few other things like shipping information, and how you want to be paid. You can set up your existing PayPal info and/or add Stripe in order to take credit/debit card payments. Let’s take a look at that in more detail.
Setting up WooCommerce Payment Gateways e.g Stripe and Paypal
Setting up Stripe is super easy – WooCommerce will actually create your Stripe account automatically!
If you’re using PayPal, you literally pop in your PayPal address here, and that will link your store to your PayPal account.
You can use both, but for the purpose of this demonstration I’ll just be using PayPal.
Once you’ve got WooCommerce set up, and come back to your site, you’ll see that it looks different – this is the Storefront theme in action.
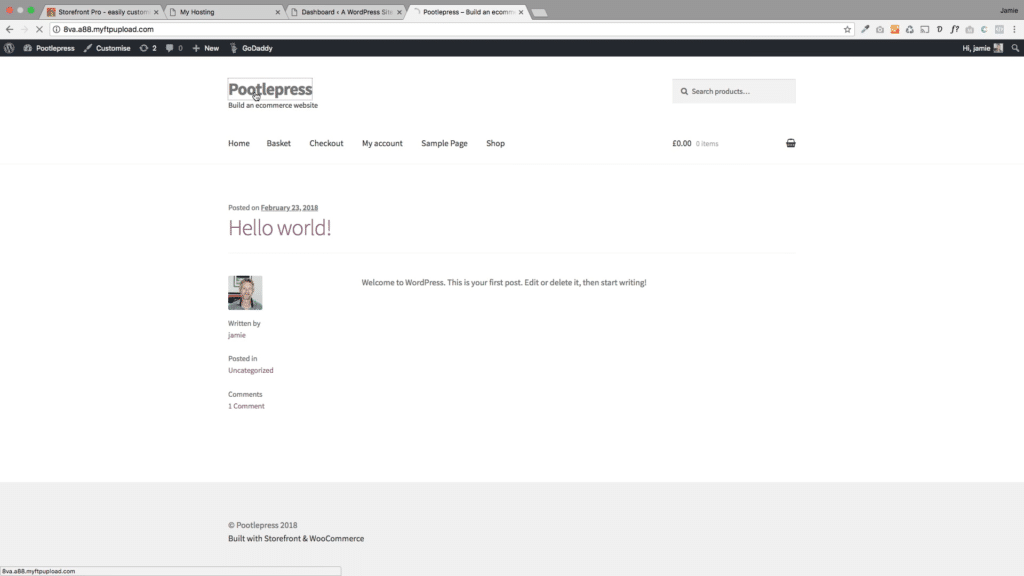
We haven’t got any products set up yet, but that’s fine. We’ll get there in a bit!
Before we get there, we’re going to need a few images to make our store look great quickly.
Sourcing Royalty-Free Photos
So that we can get our store looking great as quickly as possible, we’ll want to use the Instant images plugin – it’s great if you ever need to use stock photography on your site.
As before, we can install it by going to Plugins > Add New and searching for it.
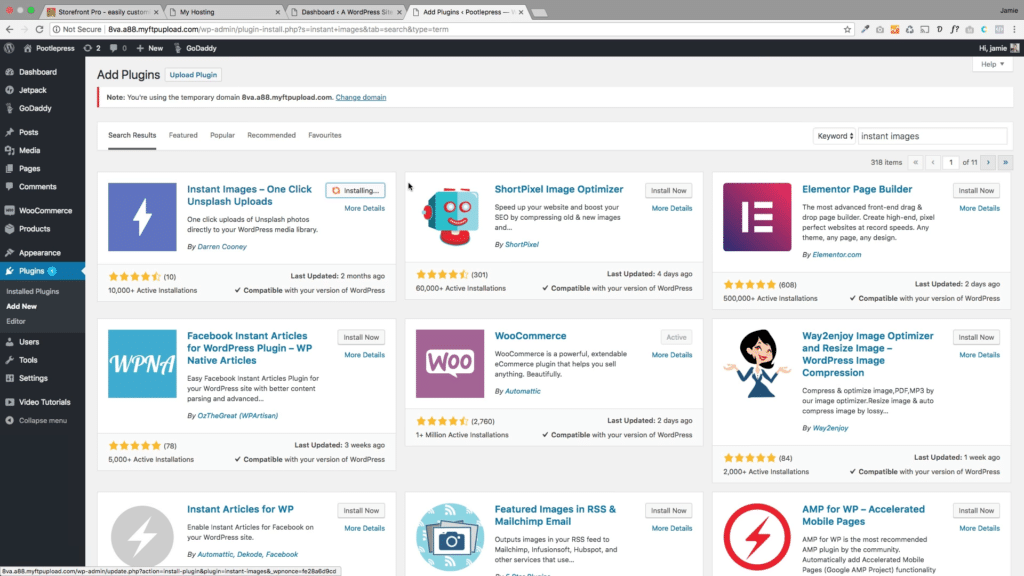
Once it’s installed, it’ll link into unsplash.com, which is a free photo library. So you can access any of the 200,000 photos on unsplash.com for free. You can then simply scroll through and add any photo you like to your Media Library with one click.

Create the Storefront Home Page
The final bit of behind-the-scenes setup is to install the Storefront Pro plugin. This gives you a ton more control over the layout of your Storefront Theme. As before, go to Plugins > Add New to install the plugin. You’ll first need to get a license code from the Pootlepress website to activate the plugin.
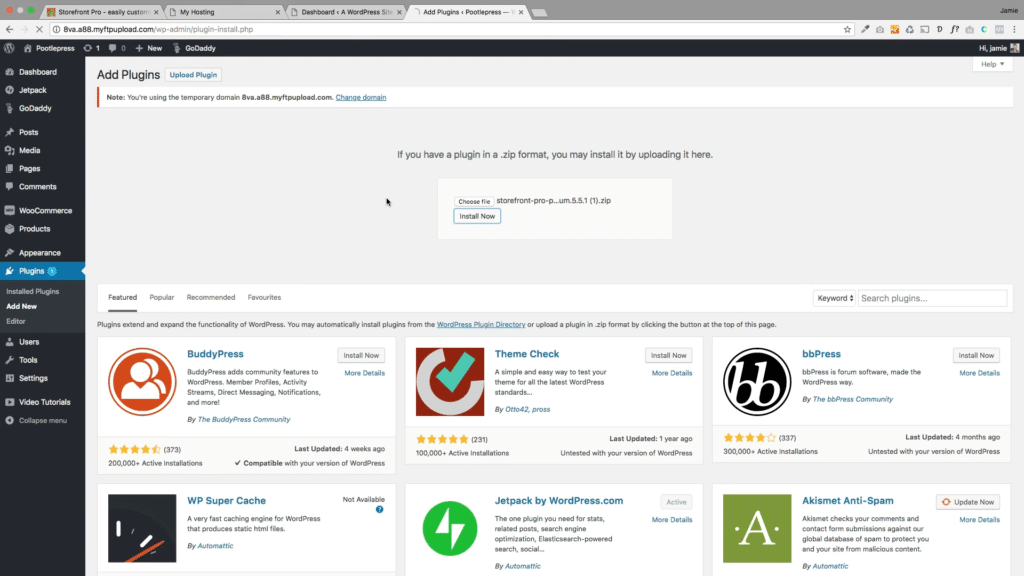
I’ll put my license in later. So now we’ve got the ability to customize our site.
So the first thing we want to do is to create a new homepage. Now I’m just going to use dummy text today, just so you can see how this works. You would obviously put it be putting in your fantastic marketing text here.
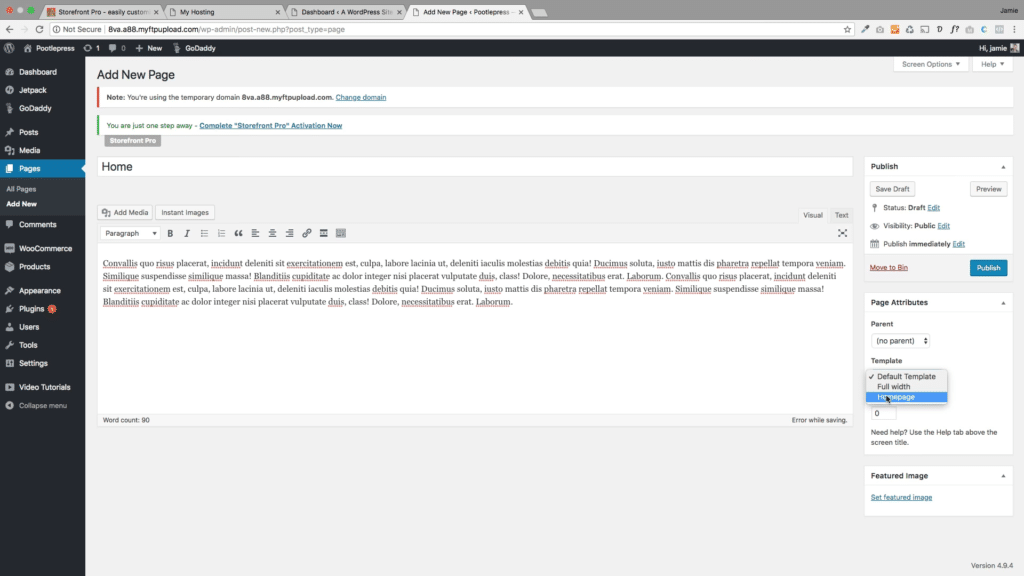
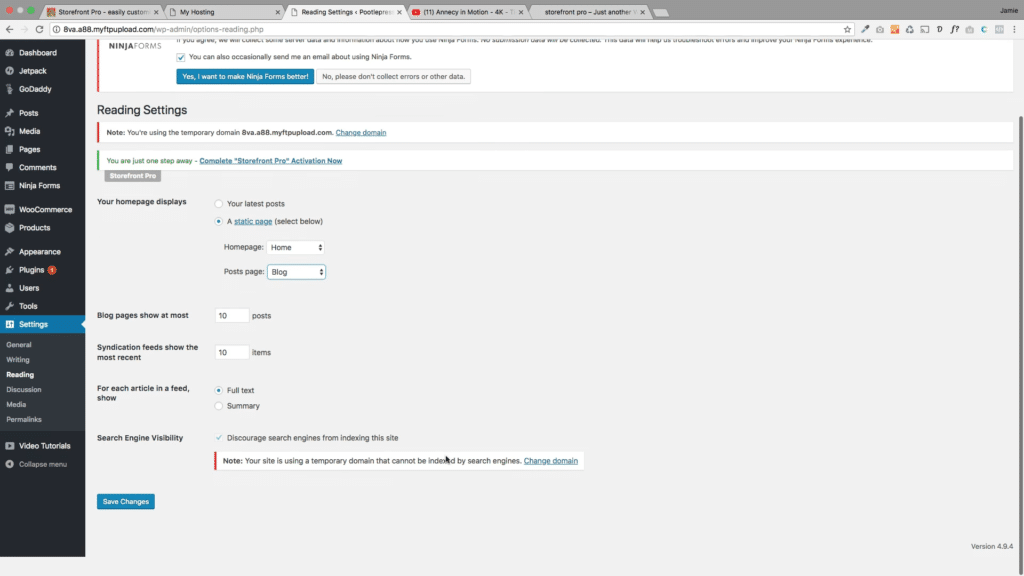
And I’m going to set this to use the whole homepage template. Crucially, we need to set this to be our homepage; by default with WordPress, as a blogging platform, your homepage will be your blog posts. You can do this as below, in Settings > Reading
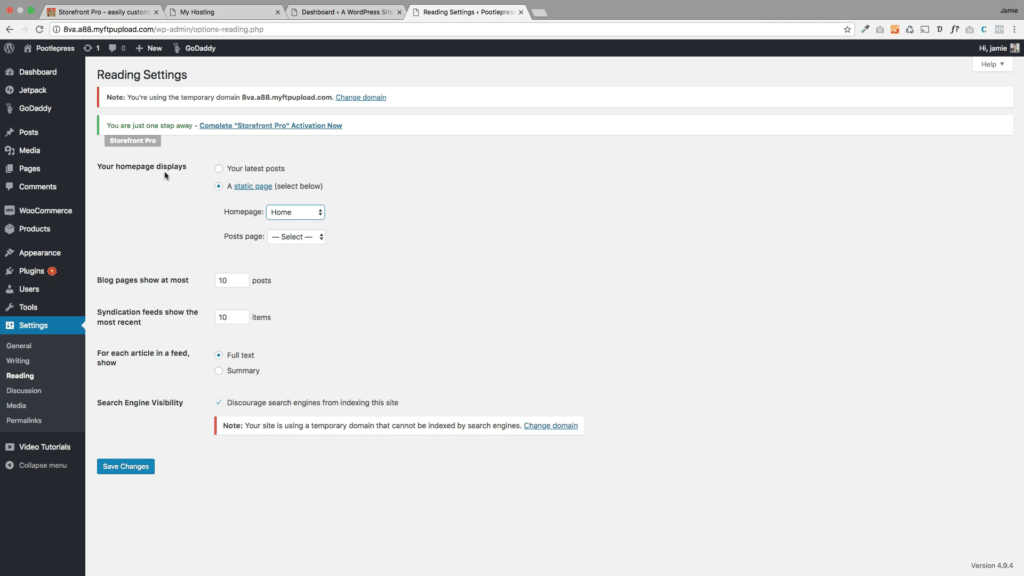
We want our “Home” page to be set as the Front Page, so let’s go ahead and set that.
And that just means that now, when anyone goes to the front page of your website, this is the front page.
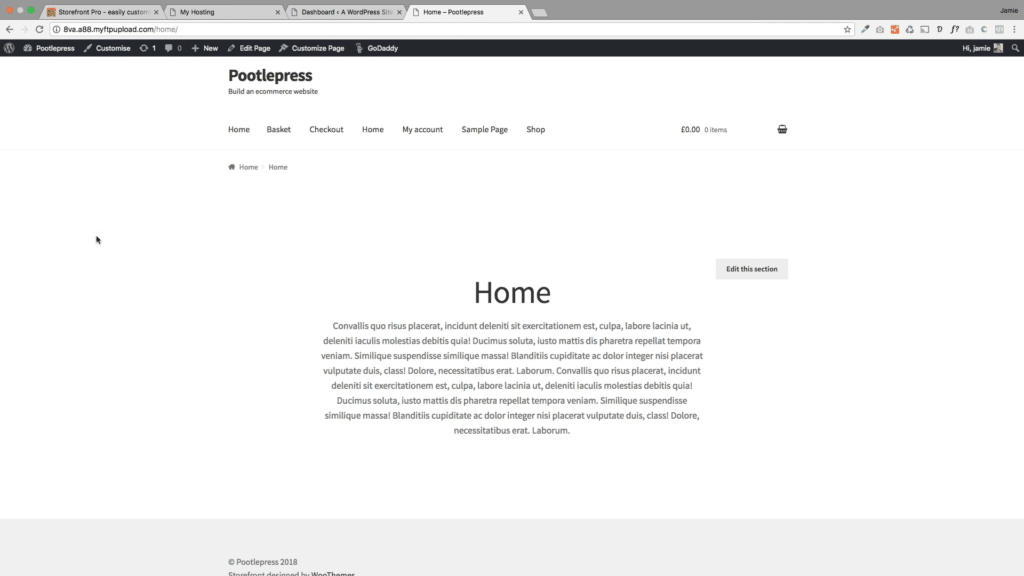
As this is the first thing anyone will see when they come to our shop, we’ll want to spruce it up a bit. So let’s just do that, and then we can get to adding products to our store.
First, let’s tweak the menu.
Creating the navigation menus
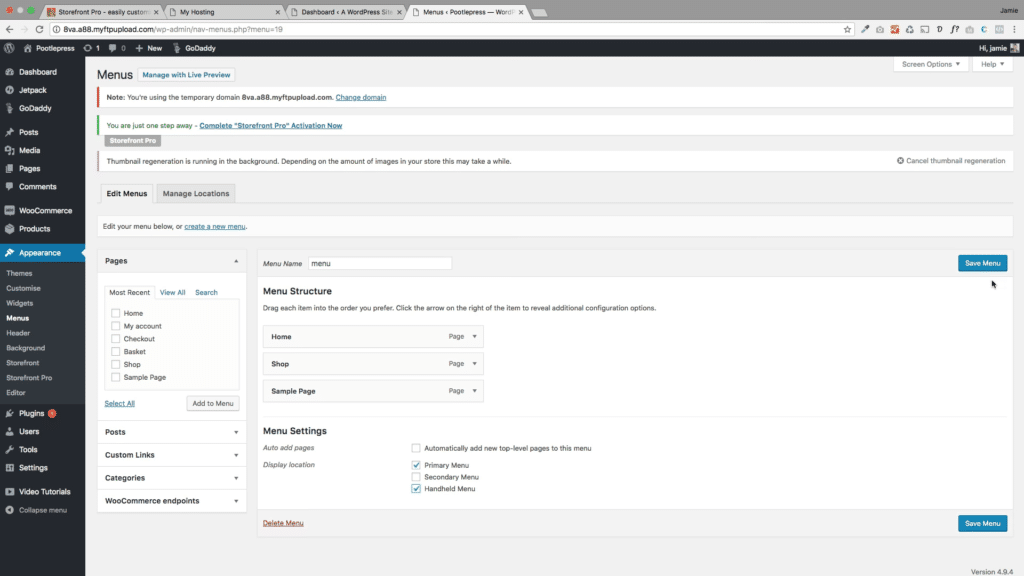
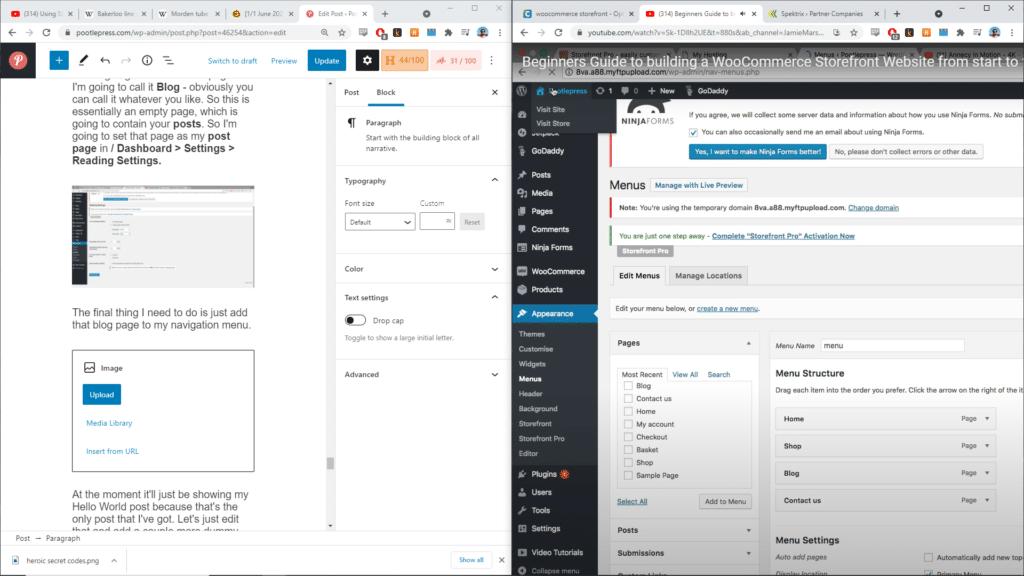
In the WordPress dashboard, head to Appearance > Menus. This is where you can create and organise your menus.
For the purposes of this tutorial, I’ll just create a quick menu and call it “Menu”. We can then go ahead and add our pages: Home, Shop, and Sample Page. Then I’m going to set that as the primary menu and the mobile menu as well.
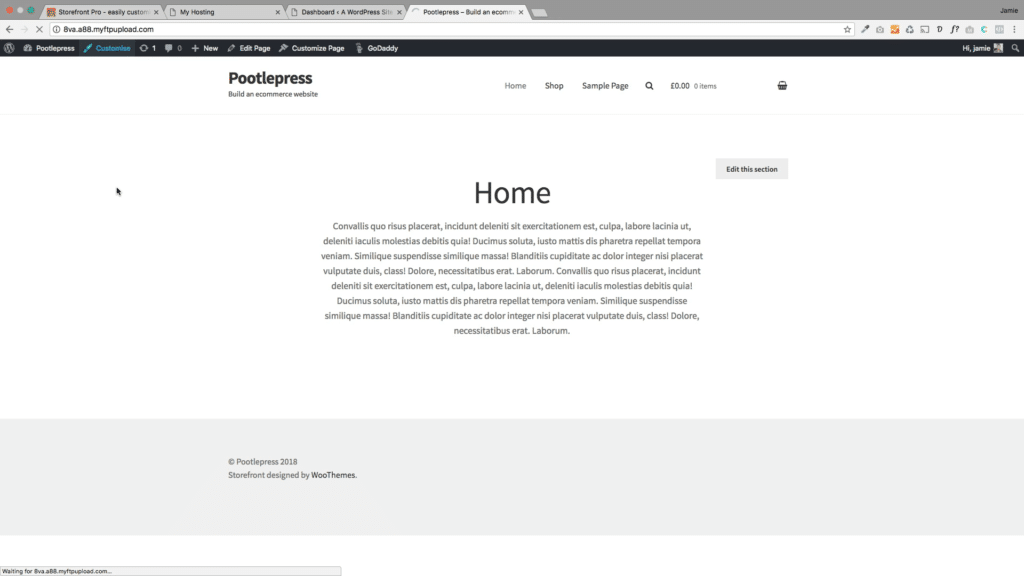
To change the menu’s appearance, you can go into the Customiser and head to Header and Navigation > Primary Navigation. Thanks to the Storefront Pro plugin we can change the Navigation Style however we like – so you can see here that I’ve flipped it over to the other side.
Adding a photo to the Home page
The next thing I’d really like on this home page is a nice big photo that shows off my site and a bit more of a visually exciting way.
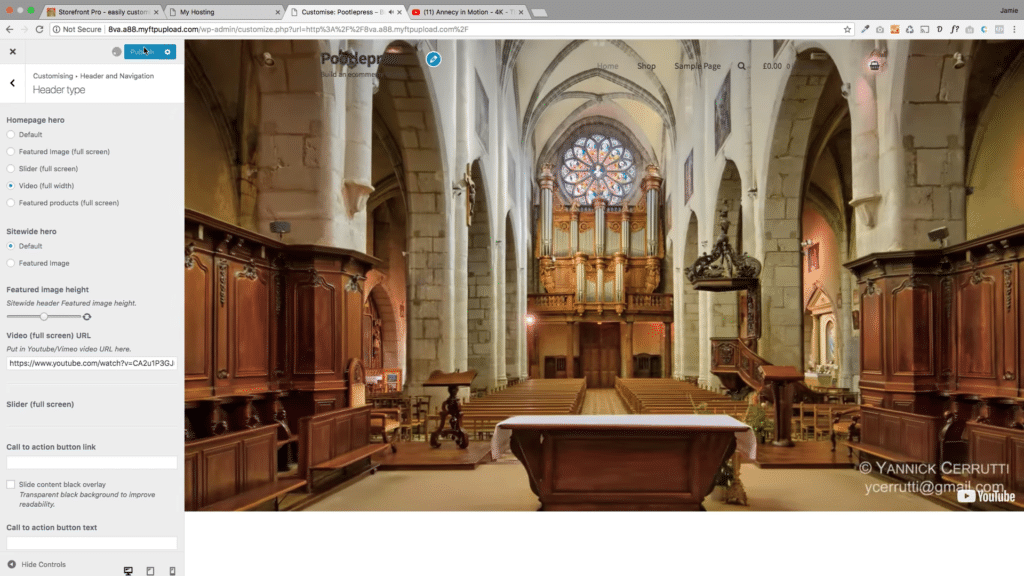
So we can again go to the Customiser and click on Header and Navigation > Header type.
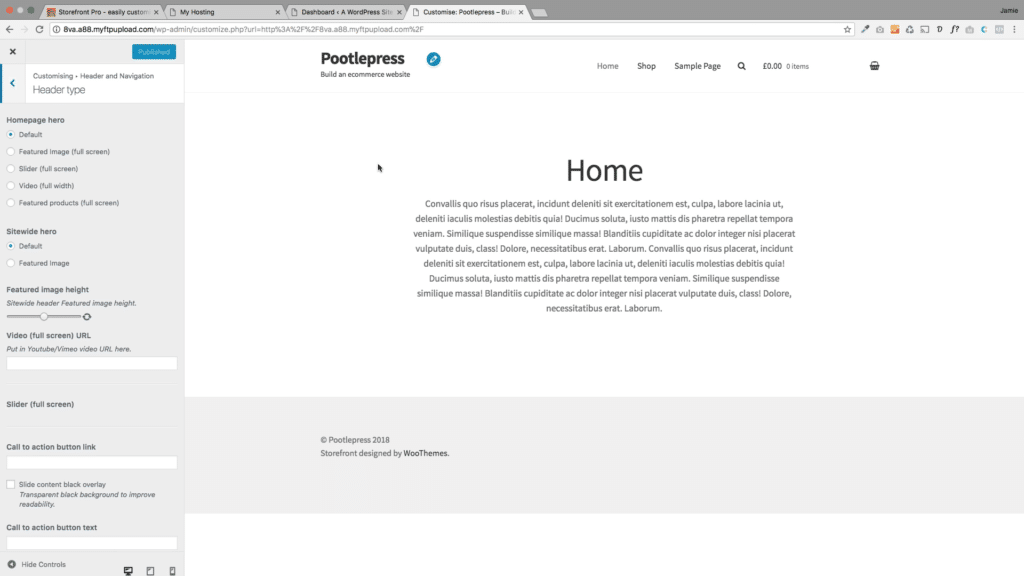
You’ll see you’ve got different options in here of what you want to use on the front page. You can even use a video – so let me just go and grab a video from YouTube quickly.
I’ve grabbed this video of a cool time-lapse just so we have something visually arresting. All you need to do is add the link to the Video URL box and voila – that will bring in the video.
Add a slider to the Storefront Homepage
You’ve got a range of different options for your home page to make it stand out from the competition. You can, for example, create a full-width slider, with options to change the image and text overlay, as you can see below, with a simply image and dummy text. You can add as many slides as you like, and change how often they autoscroll (if you want them to).
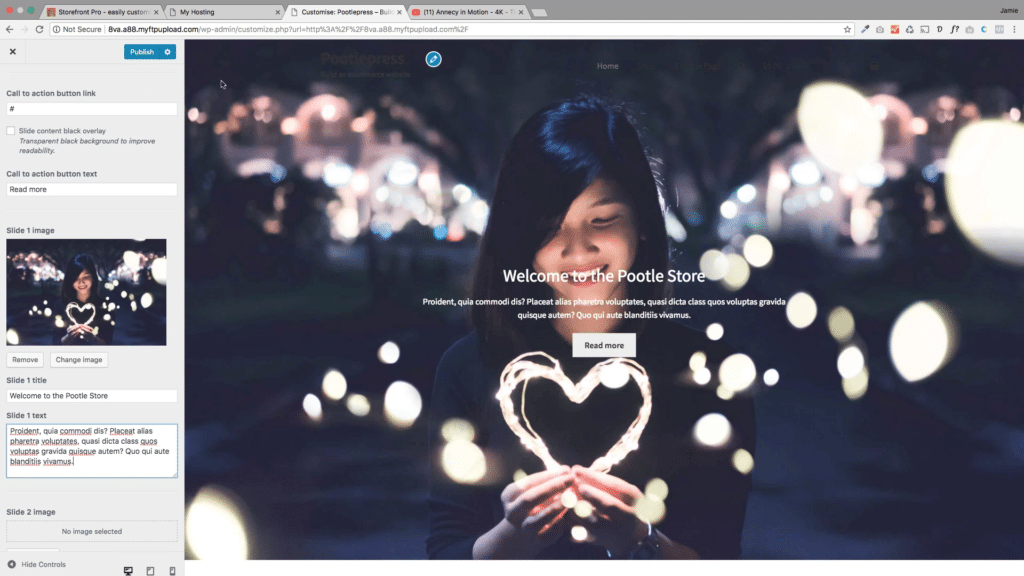
You can see a live preview of the whole thing as you create it, so the whole process is really simple.
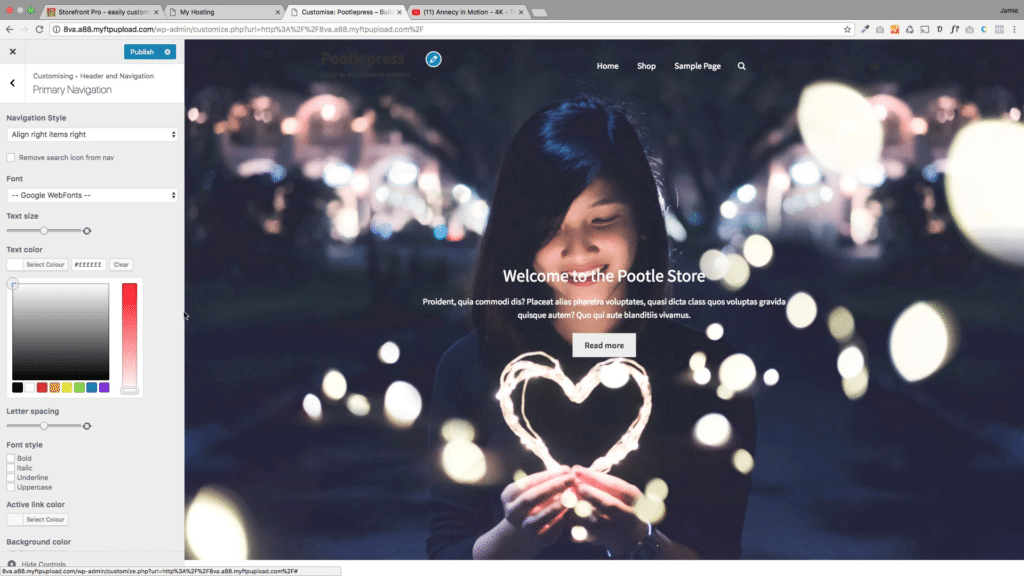
But adding that slider has made our menu hard to see. Luckily, changing the menu text colour is as simple as heading over to Header and Navigation > Primary Navigation and changing the text colour however you like. Again, this is all a live preview, so you can adjust it however you like.
Further customising the Storefront menu
The Cart is a really important part of any eCommerce store – so let’s make sure that button is nice and visibile in the primary navigation by changing its colour. This is all done from the same interface as before.
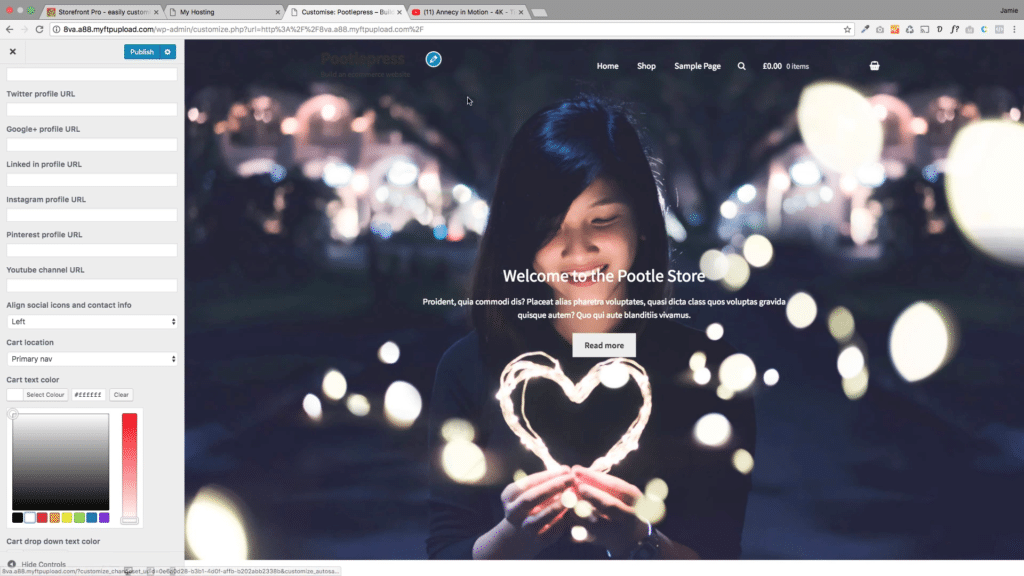
You can also add your logo wherever you like, as you can see. I’m just using a demo logo here.
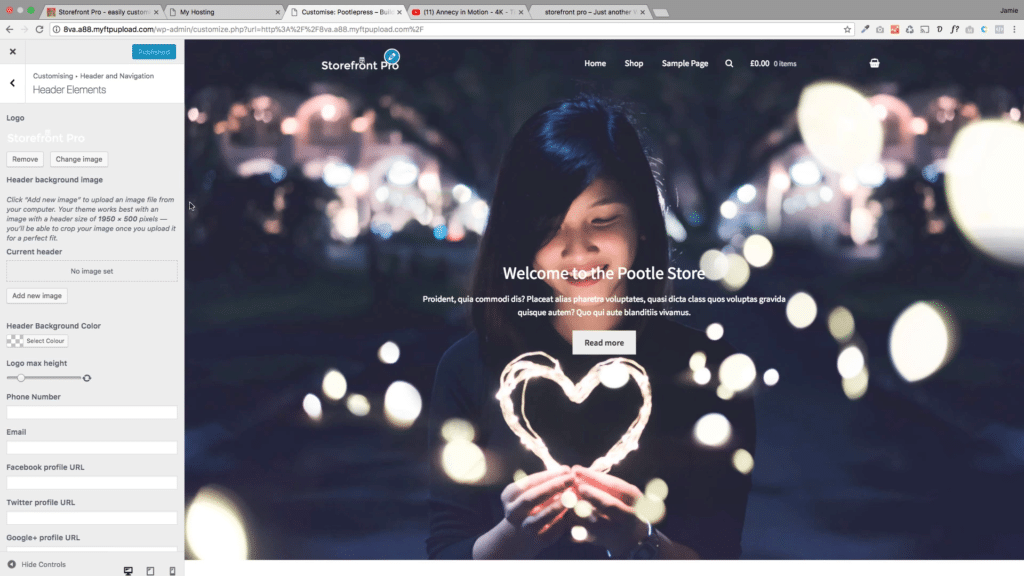
Do you want to fully customize the Storefront Theme?
Storefront Pro is a plugin that lets you fully customize the Storefront Theme without any coding required. It includes many great features and options that are normally only available for top e-commerce stores.
Storefront Pro – now used on over 5000 websites worldwide!
Thanks to Storefront Pro, we’ve got all these customisation options and more – including changing the button colours. So let’s do that – how about we go for a red button with a white background text?
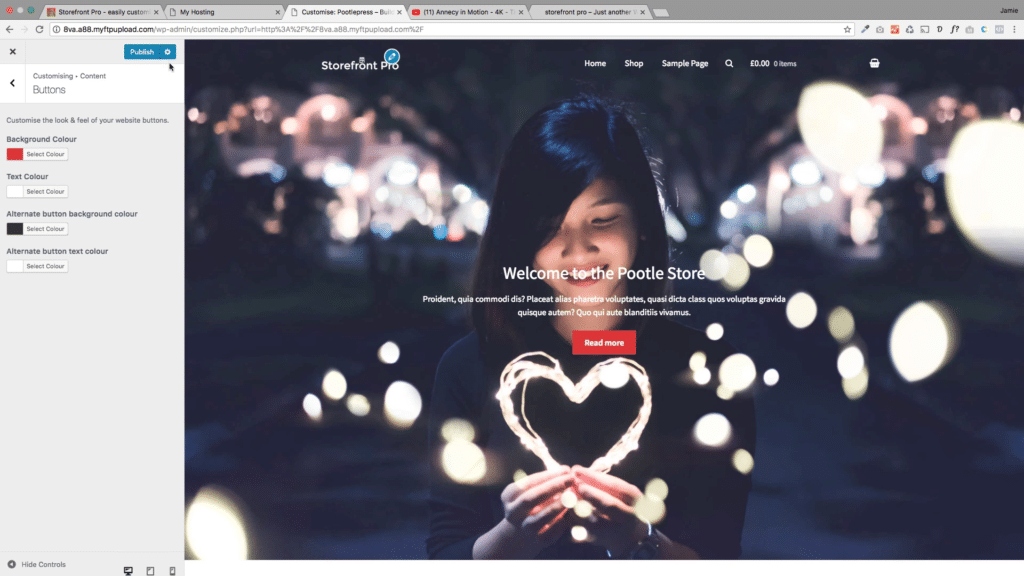
Okay! The homepage is looking really great. But what’s the point of an eCommerce store with nothing to sell? Now we’ll need to add some products
Adding WooCommerce Products
Adding new products in WooCommerce is as simple as going to Products > Add New in your WordPress dashboard. Let’s give it a name, a short description, and a price:
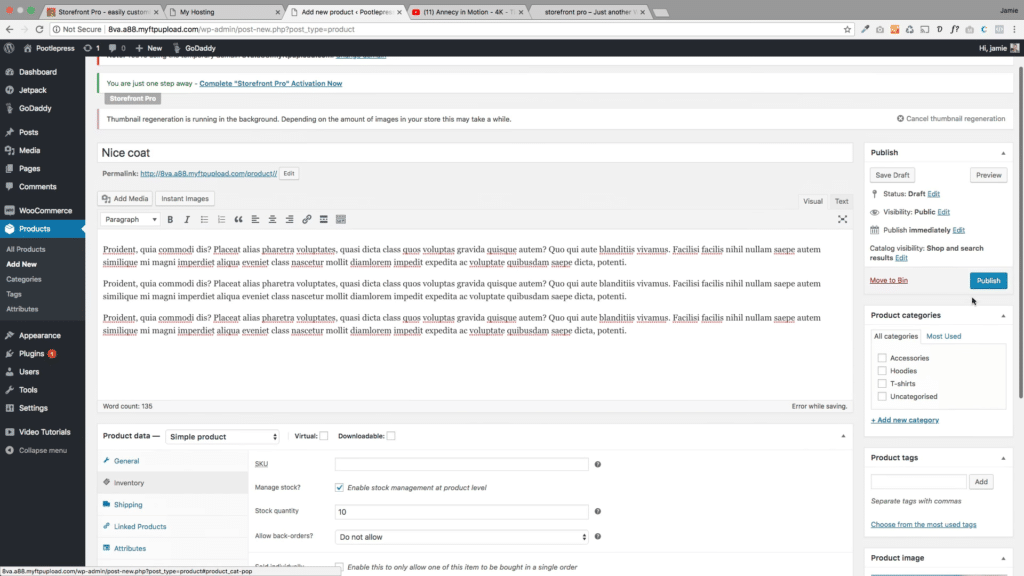
Then we simply hit publish and the product will automatically drop into your shop page. If we head over there now, we can see it’s waiting for us:
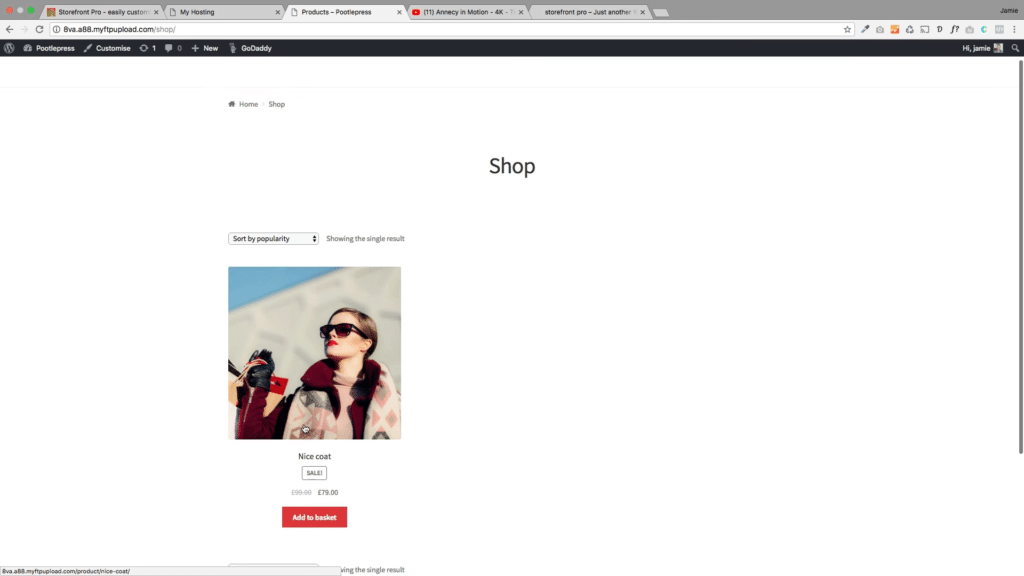
That header could use some work, though! As we went with white text on the homepage, we now can’t see the header navigation. But just as with the home page, the Storefront Pro plugin gives us a wealth of customisation options to choose from. Let’s change the background colour to black so that the white text shows up nice and clearly.
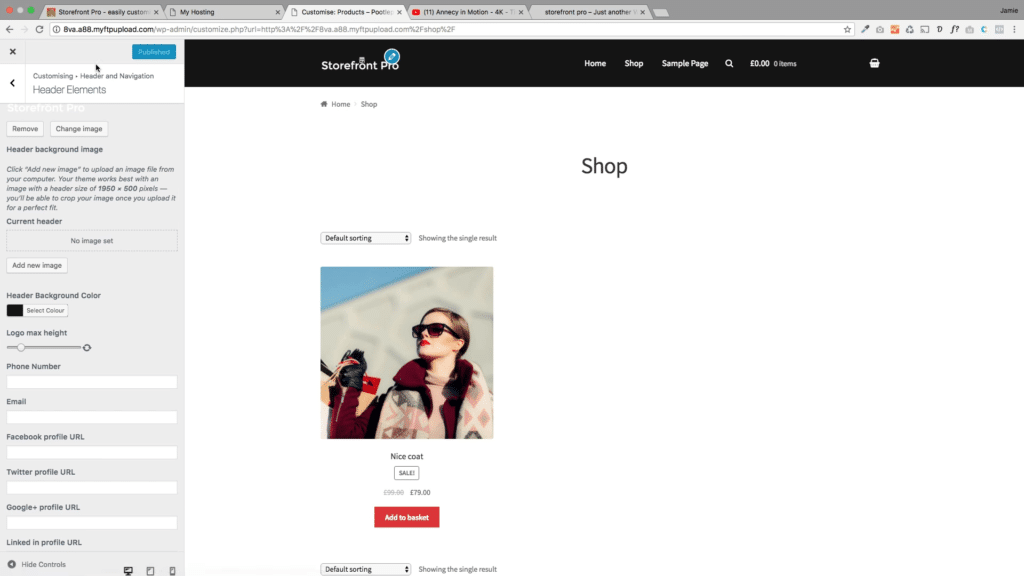
Go ahead and add as many products as you like; I’ll just add a couple of example ones here:
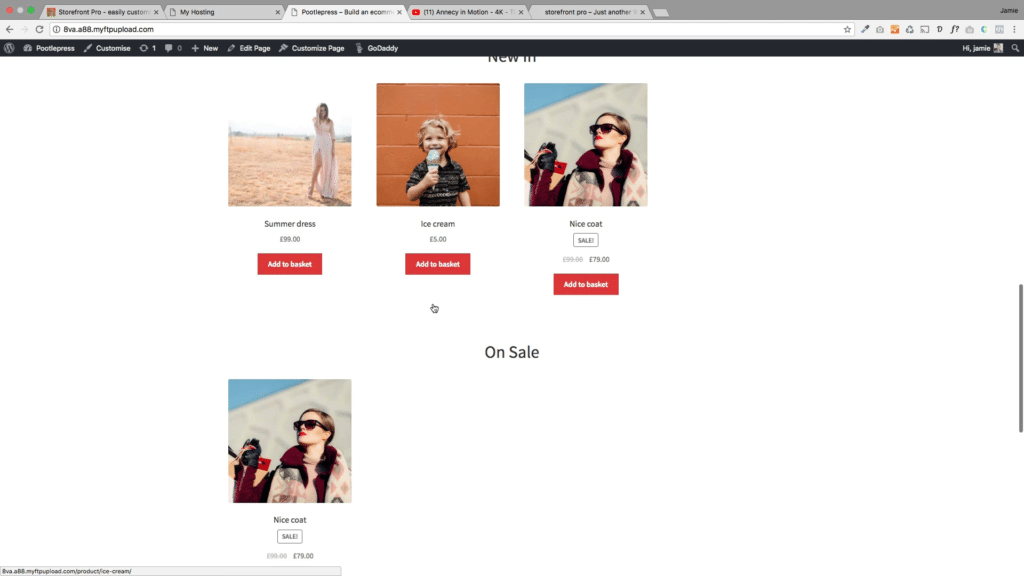
You can see that, as we add them, the WooCommerce integration automatically lets you view all products on the shop page
Customize the WooCommerce Shop Page
Storefront Pro comes with extensive options to help you customise the shop page far beyond what the Storefront theme has by default. If we head over to the WooCommerce > Shop page and click on Customise, you’ll see we’ve got loads of different options for how products are displayed.
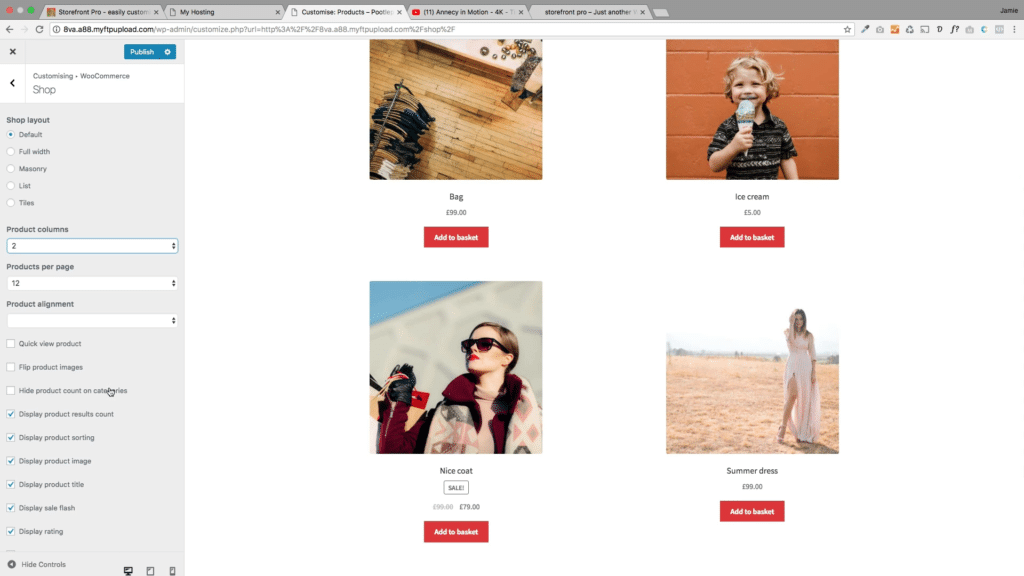
You can change the number of columns, display ratings, display the cart button, and so on. You can create whatever look for the site you like, without resorting to using CSS or child themes.
If you want even further customisation options, including the ability to completely build new Shop pages from scratch, why not check out another of our plugins, Storefront Blocks? This gives you the power to use WordPress Blocks for a range of common WooCommerce functions, essentially functioning as a complete WooCommerce page builder for shop and product category pages.
You can add blocks for featured products, on sale countdowns, recent products, and more.
If you want to customise individual product pages above and beyond what’s possible with the WordPress customiser you can use WooBuilder Blocks. The options are endless!
Hide the WooCommerce add to cart button on the Shop Page
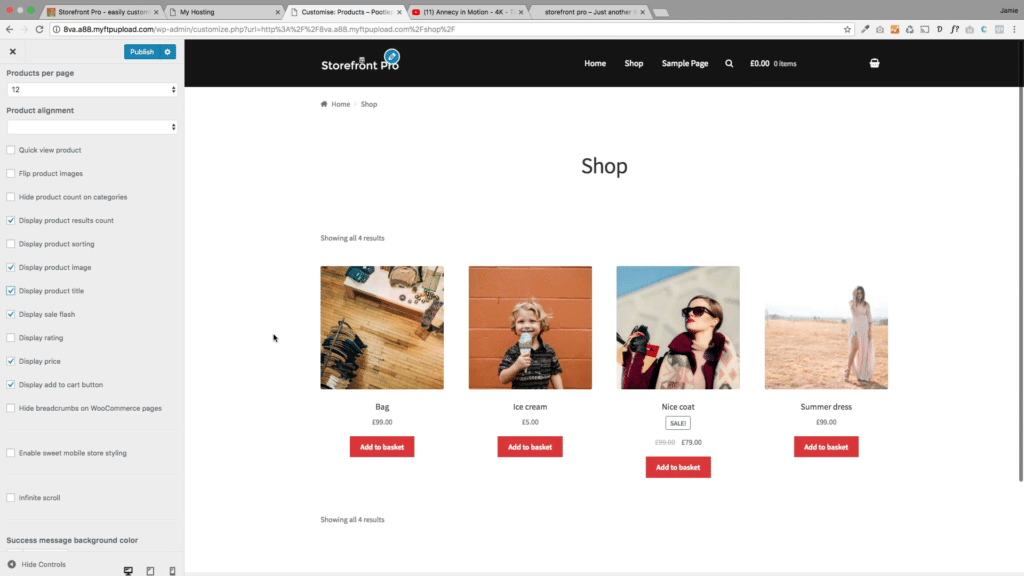
Let’s stick with keeping the Add to Cart button and the Product Title. I’m happy with that.
And the next thing I’d quite like to do is just a smarten up this Single product layout slightly. These tabs I think would look a bit nicer. So I’m going to choose to display those slightly differently, again using an option from Storefront Pro.
So again, I’m going to go to WooCommerce > Product Details and you’ll see we’ve got these other options down here where you can change some things. So if you want the accordion tabs, which I love, you can do that.
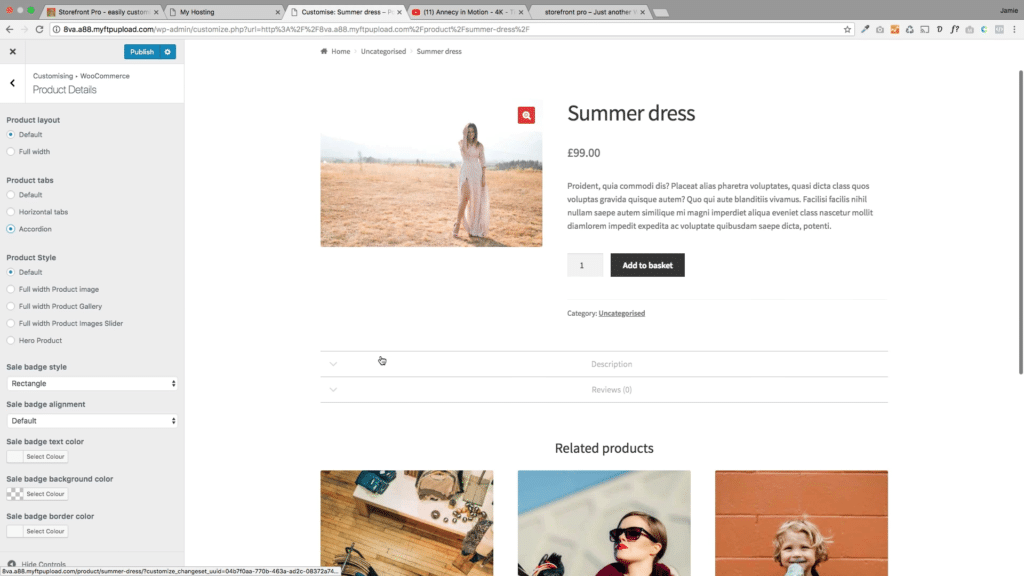
So now we’ve got ourselves a fully-functioning, if simple, WooCommerce store! People can click through and actually proceed to the checkout page. It’s all working, which is cool. The next thing I’m going to add though, is a contact page, so that people can get in touch with us with queries, comments, etc.
Add a WooCommerce contact page and form
So let’s head over to Pages > Contact and rename the page “Contact Us”. Let’s just add some dummy text and hit Publish. Don’t forget to add it to your Menu!
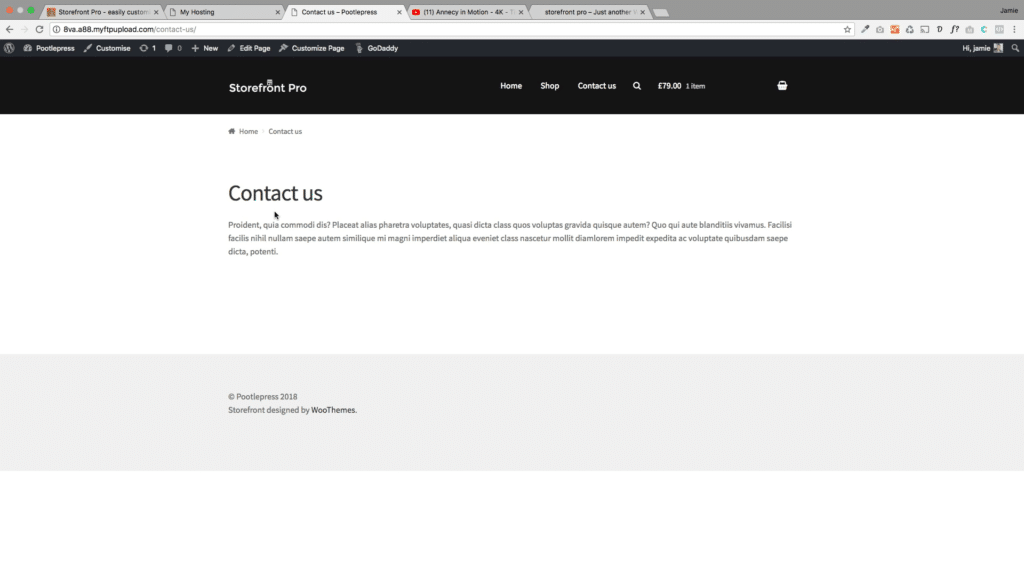
Of course, a contact page really needs a contact form. So to set that up we’re going to use one of my favourite plugins called Ninja forms, which is a free plugin that lets you do forms. Again we’ll go to Plugins > Add New and simply search for and install the plugin.
Once you install the plugin, it’ll actually give you a default contact form to work with. If you need to make any changes, you can simply head over to Ninja Forms > Forms > Edit and set up the form fields as necessary.
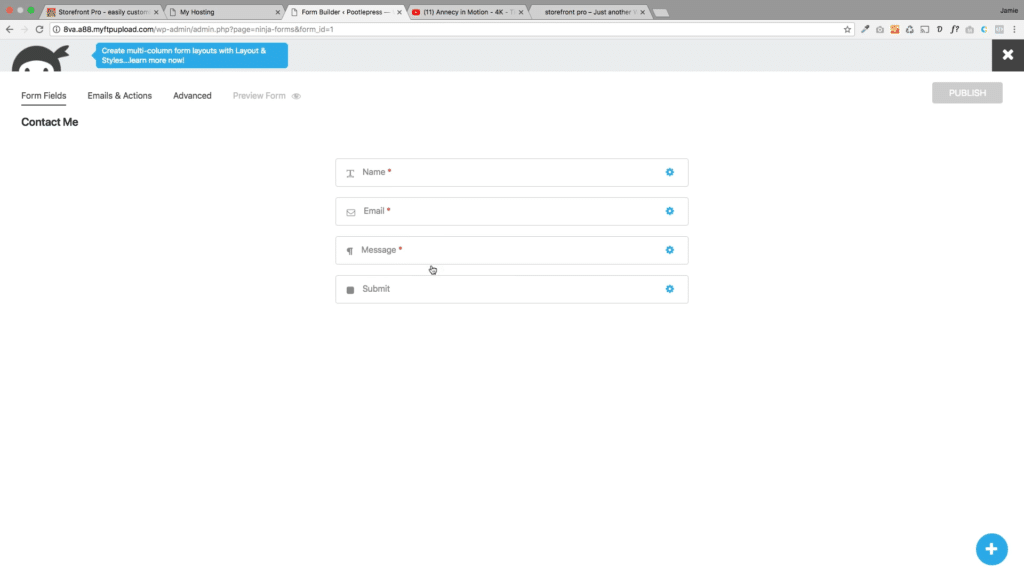
You can then add it into any page using the block editor. Simply head over to Pages > Contact Me > Edit Page. You’ll see a new button saying “add form”. Then we can just add that form onto the page. Alternatively, you can use a shortcode to add the form wherever you like.
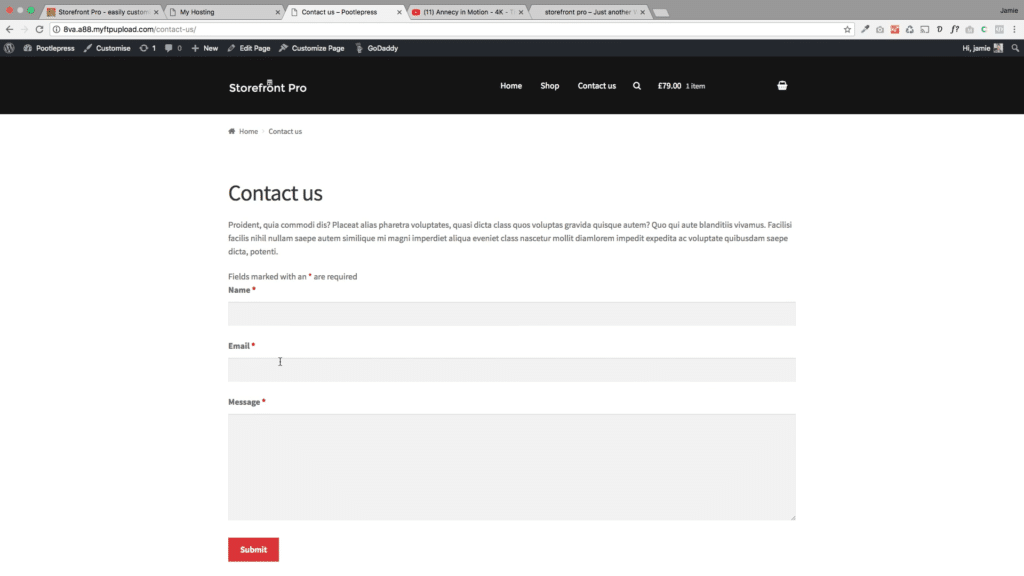
By default, form submissions will be emailed to the admin address of the website, as well as direct to your WordPress dashboard under Ninja Forms > Submissions. If you need to change any of that stuff, it’s all done via the Ninja Forms interface
Almost done! The final thing I want to add on this site is a news / blog page.
Add a Blog to WooCommerce
So I’m going to create a new page and I’m going to call it Blog – obviously you can call it whatever you like. So this is essentially an empty page, which is going to contain your posts. So I’m going to set that page as my post page in / Dashboard > Settings > Reading Settings.
The final thing I need to do is just add that blog page to my navigation menu.
At the moment it’ll just be showing my Hello World post because that’s the only post that I’ve got. Let’s just edit that and add a couple more dummy posts. You can also set a featured image for each one, which will show up on the blog page.
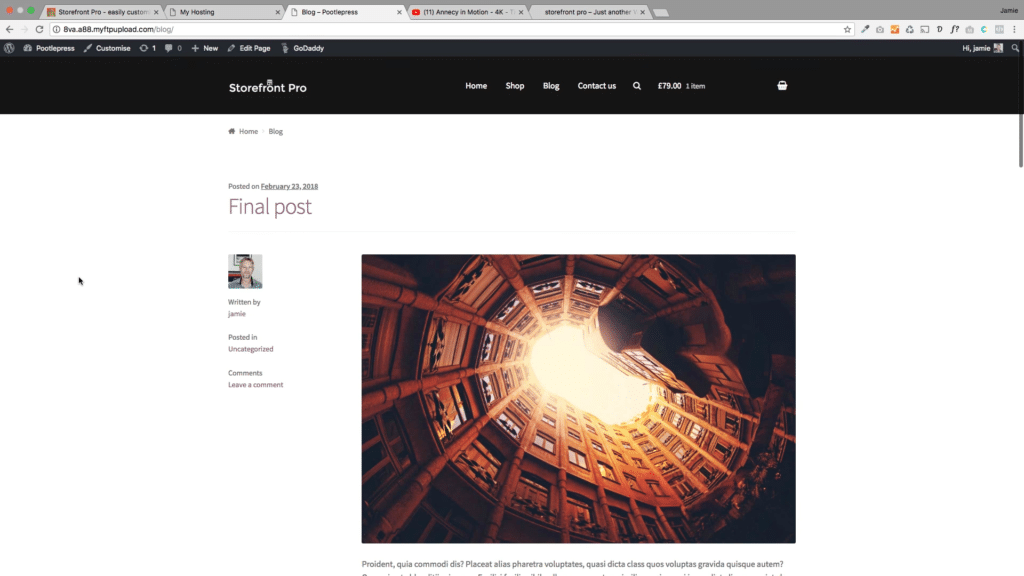
Customize the WooCommerce Storefront Blog page
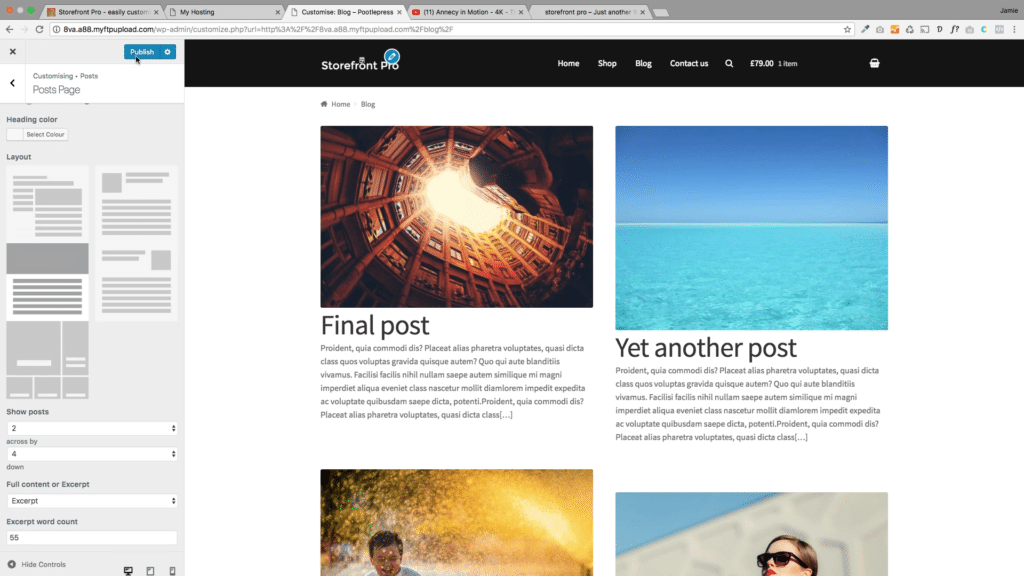
Storefront Pro gives you a range of great options for displaying your posts in a more attractive way.
By default, all the posts will show in a single stream down the Blog page. But Storefront Pro lets you change that. You can, for example, create several columns on the page.
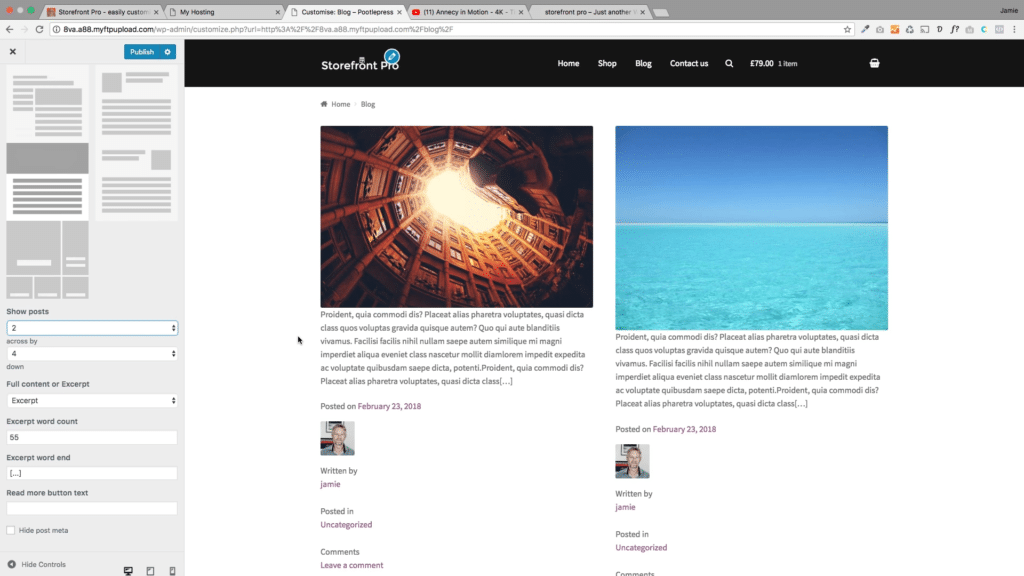
You can also edit the Heading Size and meta data. Let’s experiment with a few other blog layouts.
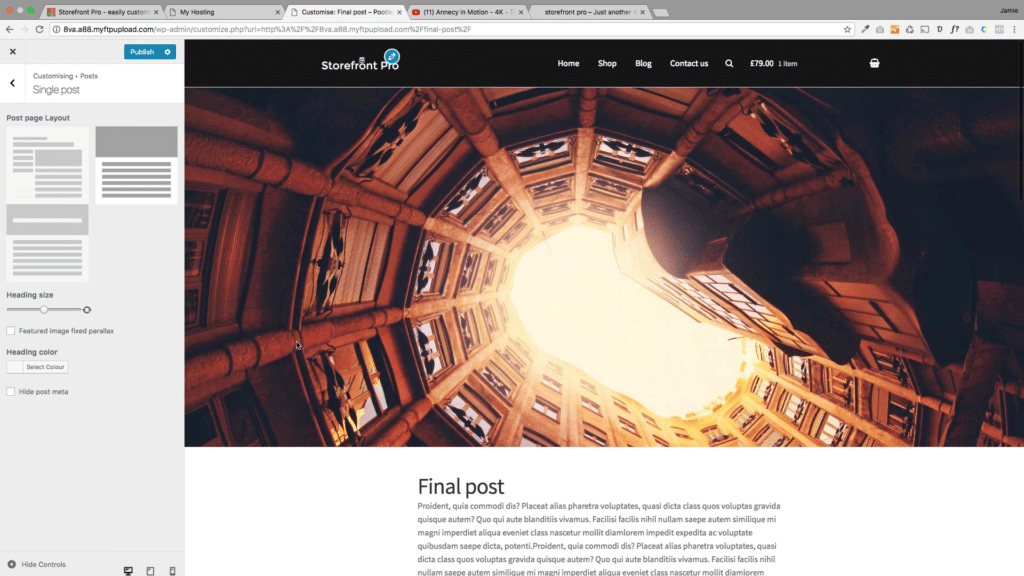
You can also change the layouts of the individual blog posts themselves from the customiser – for example, using this full panel layout, which is much more eye-catching.
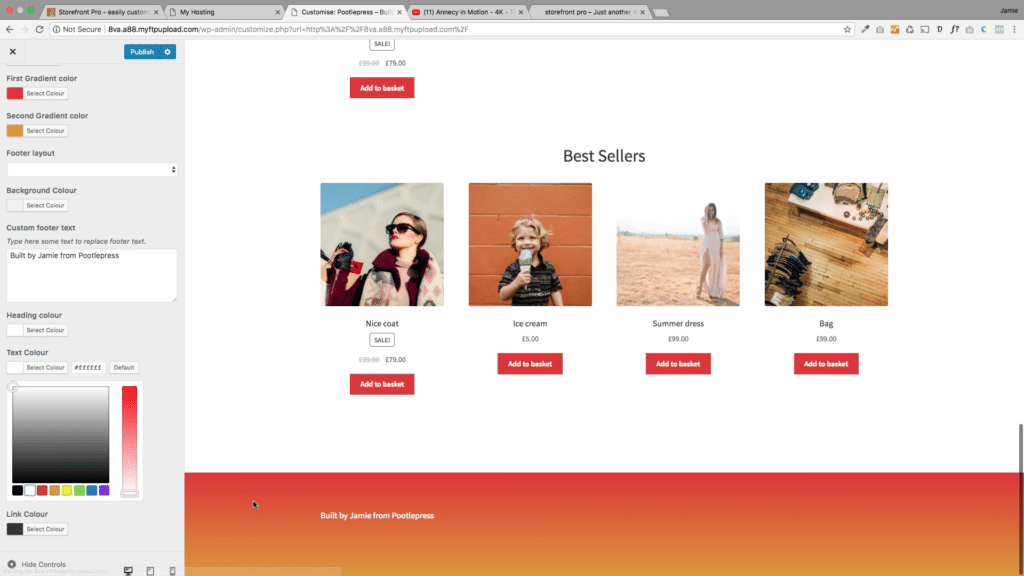
Cool that that’s looking pretty good. The final thing I want to show you is just quickly how to customize this Storefront footer down here. And again, that’s just an option in the customizer.
Customize the WooCommerce Footer
So we go to Footer Layout and you can see all the options we have for the footer – including background colour, typography, size, and so on.
And we’re done!
Create your own WooCommerce Store today!
So that’s from start to finish. I’ve got a website built on the Storefront theme looking pretty spectacular. We can add more product, posts, and make changes as and how we need. We’ve learned how to customise the shop page and products, and the layout of our store and blog posts.
Hopefully you can see how easy it is to build a WordPress website completely from scratch, with just a few plugins and a little knowledge. So I hope you enjoyed it. If you’ve got any questions, please do feel free to put them in the comments below.
If you want to get started with the perfect WooCommerce store today, be sure to check out our Storefront Pro plugin to ensure your store gets off to the best, most beautiful start!
Leave a Reply